
 I saw this recipe on facebook and loved the idea of a savory, veggie-filled breakfast. Since now I like sweet potatoes, I was really excited to try this dish. I also love brussel sprouts, so I knew this had to be good.
This quick breakfast was delightful. It took a few minutes to prep the vegetables, but once they were ready, the whole thing came together really fast. Because the sweet potatoes are finely shredded/grated, they really don't take that long to cook. I added a fried egg on the side and decided to add this to my weekly breakfast menu. It's fast, nutritious and soo good!
Here is the recipe for Brussels Sprout-Sweet Potato Hash
Showing posts with label thyme. Show all posts
Showing posts with label thyme. Show all posts
Tuesday, January 17, 2012
Brussels Sprout-Sweet Potato Hash
Friday, September 23, 2011
Hearty Vegetable Stew
 It has cooled down a little bit around here the past week or so, and that means it is okay for me to make soup and/or stew more often. My husband doesn't really enjoy either of these, but he really doesn't like them in the heat of summer. Now that it is September, it is officially soup/stew season. Even though it will probably warm back up soon. (Fine with me!) The calendar says September and Fall, so soup and stews are on the menu.
As soon as I saw this stew in Everyday Food Magazine, I knew I would make it. It is easy. It is quick. And it is full of veggies. I loved this even though it was so simple. It had great flavor and my family really liked it too.
Hearty Vegetable Stew
Everyday Food Magazine September 2011
2 Tablespoons olive oil
3 carrots, thinly sliced
3 celery stalks, thinly sliced
1 medium onion, diced medium
salt and pepper
1 Tablespoon tomato paste
2 14 oz cans diced tomatoes
1 bunch kale, stems removed, leaves chopped
1 can cannellini beans, rinsed and drained
2 sprigs thyme
In a large, heavy pot, heat oil over medium. Add carrots, celery and onion; season with salt and pepper. Cook, stirring occasionally, until carrots soften, about 5 minutes.
Add tomato paste and cook, stirring, 30 seconds. Add tomatoes, kale, beans, thyme and 2 cups water; bring to a boil. Reduce to a rapid simmer and cook until slightly reduced, 15 minutes.
Tuesday, June 21, 2011
Roasted Eggplant, Zucchini, and Chickpea Wraps
 This was an exciting dinner because I was able to use the first 2 eggplants that I harvested from my garden. My dad planted a Ichiban eggplant plant for me and I was a little worried about it producing any eggplant because the bugs were really enjoying eating the leaves. I was so excited when I saw a few eggplants growing and I was able to pick them after a few days.
The roasted veggies in this wrap are something that I could eat at every meal. Simply roasted, with fresh herbs- nothing compares to roasted vegetables in my opinion. The fresh mozzarella was really delicious (although you can't really see it on my wraps- it is there, beneath all the yummy veggies).
I made double the amount of the roasted veggies because I really enjoy having them with eggs for breakfast or to top a salad for lunch.
Here is the recipe for Roasted Eggplant, Zucchini, and Chickpea Wraps
* I used zucchini, summer squash, eggplant, and green peppers
* I used less oil than called for
Friday, June 3, 2011
"Cooking School"- Chopped Steak Salad
 My daughter picked salad for our next "Cooking School" experience. We decided to make at least 2 kinds of salad. This was the first one we picked because it was a main dish salad that had lettuce as a main component. I also thought it would be fun to make a homemade Italian dressing since I prefer homemade dressings to bottled ones.
Also, please notice that I made a salad that contains beef. We cooked a flank steak. I am amazed. And it was easy. And it was tasty.
My daughter helped chop, rinse, cut and prepare the dressing. This was a great one to make together because there were lots of steps that she could help with.
This salad was fairly easy and perfect for a main dish salad. I don't think it would have been as good without the homemade dressing, but that is obviously just my opinion. Fresh herbs really made this dressing delicious.
Here is the recipe for Chopped Steak Salad from Real Simple Magazine
* I cooked the flank steak for a few more minutes than the recipe called for
Here is the recipe for Homemade Italian Dressing using Fresh Herbs
* I used fresh Italian Parsley, Basil, and Thyme
*I only used olive oil
*I didn't measure my vinegar or oil- just mixed it until it looked right
Monday, March 21, 2011
Swiss Chard Ravioli
 Swiss Chard is my favorite food. It's green, healthy and delicious. You can eat the whole thing- stems and all. It has great flavor and can be turned into anything, as you can see by this recipe for Swiss Chard Ravioli.
I can't remember how I found this recipe but I knew I was going to make it as soon as I saw it. I love any take on Swiss Chard and this was something that I thought looked really original and interesting.
The ravioli is made with wonton wrappers, which makes that part of the recipe much easier. I decided to use water to seal my ravioli, instead of an egg-which the recipe suggested, simply because that is what I use to seal wonton wrappers when making pot stickers. I had one ravioli that exploded and I think looking back, using an egg would have been a better idea, since boiling the ravioli really spins them around a lot.
The swiss chard is sauteed with a shallot and a little oil (the recipe used butter, but I avoid butter when I cook), and then mixed with some ricotta cheese, thyme, and fresh parmesan. That is what makes up the filling for the ravioli. Then the stems are boiled in some chicken stock, mainly to give the stock some color. The recipe said to drain the stems, but I left them in there, with a few of the leftover leaves and we ate them too.
This was a fun twist of ravioli and a great new way to use swiss chard.
Here is the Recipe for Swiss Chard Ravioli adapted from Martha Stewart
* I used a Tablespoon of canola oil instead of butter to saute the shallot and chard
* I did not discard the stems and extra leaves- I served them in the broth
* I used skim ricotta cheese
* instead of using an egg to seal the ravioli, I used water
Friday, November 19, 2010
Wheat Berries and Roasted Squash Pilaf
 Isn't this a beautiful dish?
I thought it was and that is why I tore this recipe out of a recent issue of EveryDay with Rachael Ray and wanted to make it ASAP.
I used wheat berries instead of Farro, which added more time to the preparation, but it is completely possible to cook the berries ahead of time and then, you don't have to wait for an hour while they are cooking.
This is a fairly simple dish. Roasted butternut squash, wheat berries, fresh thyme, lemon juice, olive oil, green onions and dried cranberries.
Not too fancy, but you get a little bit of everything-chewy, sweet, salty, tart.
I really liked it. The only thing I would change about it if I made it again would be to take out the dried cranberries (I felt they added too much sweetness, since butternut squash tends to be a little sweet anyway) and add some beans, (maybe garbanzos).
My family was not so kind about this dish. My husband didn't like the squash, my son didn't like the dried cranberries, etc. So, there were a few people around the table who weren't really very pleased with the flavor combinations in this one.
I think it would be a great side dish to a holiday meal (it was intended to be featured at Thanksgiving) and I plan to make it again with a few changes.
Recipe for Farro and Roasted Squash Pilaf
* I used wheat berries instead of Farro
Sunday, July 11, 2010
Beet Carpaccio
 I absolutely love going to the Farmer's Market.
A couple of weeks ago I was lucky enough to get one of the participants' last bunch of chioggia beets. I was so excited, I could hardly stand it.
It was the day before father's day, so I knew that I would be working these beets into the menu somehow.
I love beets cold or warm, raw or cooked, so I was looking for a interesting, new way to serve them.
I don't remember exactly how I found this recipe for Beet Carpaccio, but it looked delicious and I knew it would be a fun way to enjoy our beautiful beets.
This dish has you boil the beets until slightly tender, then the beets are thinly sliced and layered on toasted baguette slices. Cheese, herbs and olive oil are sprinkled/drizzled on top to finish them off.
I used feta cheese instead of blue cheese since that is what I had in my fridge and I knew that beets taste really good with feta.
I also used fresh thyme as the herb for seasoning.
This turned out to be a beautiful and very yummy appetizer. A perfect choice.
(Carpaccio refers to the slicing the beets thinly in this dish. Traditionally carpaccio is a dish of raw meat or fish, thinly sliced, but it is sometimes seen now to mean thinly sliced, and can be used to describe fruits, vegetables, etc.)
Recipe for Beet Carpaccio
* I used fresh thyme to top my beets
* I used feta cheese instead of blue cheese
Wednesday, June 16, 2010
Butter-Almond-Crusted Fishwiches
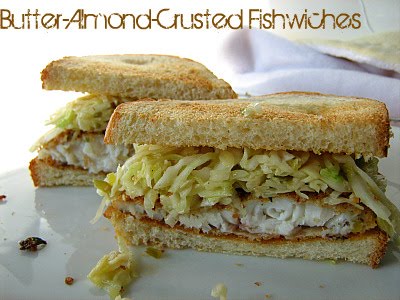
This is what I made the night my son told me I should open a restaurant. This sandwich is the reason my son thinks I am amazing. Well, one of the reasons.
I saw this recipe in Everyday with Rachael Ray and thought it would be a good dinner. The kids love fish and I want to like slaw. The fact the the slaw here uses dijon mustard, dill pickle relish, a little honey & oil, (none of that gross white stuff), made me very hopeful.
I decided to follow the recipe as closely as I could. (Of course, I had to get rid of some of the fat, like the butter which I reduced almost to nothing to cook the fish in).
I bought some freshly baked Italian sandwich bread from a local bakery and got to work.
I used fresh breadcrumbs, which I made with whole wheat bread, in the breading.
The combination of flavors was really great. The fresh thyme stood out. The almonds in the breading were really delicious.
My kids and hubby raved about this. I really like it too.
I don't really know what else to say about it besides it was absolutely fantastic. Definite repeat.

Recipe for Butter-Almond- Crusted Fishwiches * I used 1 Tbls of oil in the slaw
and 1 1/2 Tbls dijon mustard
* I made my own breadcrumbs, using 3 pieces of whole wheat bread
* I didn't use the all that butter when cooking the fish

Sunday, March 21, 2010
Caribbean Red Beans and Brown Rice

A couple of weeks ago I really wanted to make beans and rice. I don't know why exactly, it just sounded like a good option for a weeknight dinner.
I wanted to try Red Beans and Rice, so I searched for recipes online and in my cookbooks.
I kept looking and looking, but most of the recipes I saw had some sort of meat in them, either just for seasoning or to go along with the dish.
I wanted to try a recipe that was mainly just the beans and rice without any meat.
Since I have been using my Mayo Clinic Cookbook a lot lately, I decided to look there for a recipe and found one, with a Caribbean twist.
It also used brown rice, which made me really happy.
There is a unique combination of spices and herbs in this version- allspice and cloves- which add part of the caribbean flavors, as well as the cilantro.
I left out the hot sauce, mostly because I wanted my kids to be able to eat this without saying it was too spicy, but left in the cayenne pepper.
I also just used one kind of brown rice, instead of a combination.
You could probably substitute canned beans instead of cooking your own dried ones, just make sure to drain and rinse them and I would say use 2 cans.
Soaking dried beans doesn't really take that much effort, you just have to remember to do it the night before you are planning to make the dish.
We really liked this version of red beans and rice. It was full of flavor and very filling. A great weeknight meal.
Recipe for Caribbean Red Beans and Brown Rice
Thursday, March 4, 2010
Quinoa Cakes with Ham, Onion, and Chard
 I saw this recipe in Everyday with Rachael Ray Magazine and knew I had to make it as soon as possible.
It combines two of my favorite ingredients- quinoa and swiss chard.
I didn't really follow the recipe.
The recipe wanted caramelized onions, but I don't really care for those, so I kinda just did my own thing with the swiss chard and ham.
I followed the recipe for the quinoa cakes though.
I used Ellie Krieger's technique for making the ham crispy that I first discovered when I made her Cobb Salad. Basically, you slice the ham and cook it in a hot skillet, coated with cooking spray until it gets nice and crispy- it only takes a couple of minutes.
I cooked my swiss chard like this- making sure to keep all the beautiful stems in there, since they get nice and tender and yummy.
The final outcome was a really delicious dish.
You can leave off the ham pieces and make sure you cook the quinoa in vegetable broth and it makes a really great vegetarian dish.
Either way- this was a great success.
Really pretty with the chard and really tasty too. You can find the original recipe by following the link below
Recipe for Quinoa Cakes with Ham, Onion, and Chard
Monday, December 14, 2009
Butternut Squash Soup

or maybe it should be called Butternut Squash Puree. I don't know exactly.
Did you hear about the hugest butternut squash ever?
Well, if you didn't, I will just tell you that this soup/puree is the last food item that I made with my gigantic squash.
I cut my squash into cubes and roasted it in the oven with a chopped onion, fresh chopped thyme, rosemary, and oregano. Of course, it was tossed with olive oil, salt and pepper.
I roasted it for about 25-30 minutes at 425 degrees and when the squash was tender, I put the oven roasted mixture in the food processor.
I added some chicken broth, just to thin it out a little bit and, there you go- soup or puree or whatever you want to call it.
Healthier than some recipes because it doesn't contain any cream or half and half and so easy.
So if you happen to have a butternut squash on your hands and have no idea what to do with it, roast it in the oven. There are so many possibilities once you have all those tender little cubes of roasted squash!
Wednesday, December 9, 2009
Roasted Butternut Squash Pizza with Arugula and Spinach
 Once upon a time there was the most gigantic butternut squash in the whole entire world.
I happened to find this huge squash and I bought it. It was 18 inches tall.
I was able to make this Bundt cake that had a couple cups of shredded butternut squash, these roasted veggies,
both of these stuffings/dressings, a soup (which I haven't posted yet) and I STILL had some squash left.
I roasted the rest of the squash cubes, along with a large chopped onion, in the oven with fresh oregano, fresh thyme, and fresh rosemary.
Then I remembered Maria's post about Pizza that was topped with butternut squash and I decided that sounded really good. I didn't follow her recipe, but I used her idea. I used a pre-made whole wheat crust, just because I had one that needed to be used. I also had some arugula and spinach that I thought would be great under the squash.
I drizzled my crust with a little bit of olive oil, heaped on tons of arugula and spinach and then topped the greens with my roasted butternut squash/onion mixture.
I sprinkled feta cheese and shredded mozzarella cheese on top and put it in the oven for a few minutes.
Ok, people. This was the most delicious pizza I have ever tasted. Ever. So good.
I can't tell you how great the flavors went with each other.
Unbelievable.
I know there are people out there that believe the simplier the better when it comes to pizza. I agree-sometimes.
This is a topping heavy pizza, but it is so good. And pretty too. And it just seems like it has to be good for you because of all the veggies.
That probably only applies if you don't eat the entire pizza yourself. Good luck with that.
Roasted Butternut Squash Pizza with Arugula and Spinach
pre-made whole wheat or regular pizza crust (Here is my fave quick crust)
3-4 cups butternut squash cubes
1 onion, chopped
fresh thyme
fresh oregano
fresh rosemary
salt and pepper
olive oil
spinach
arugula
feta cheese
shredded mozzarella cheese
Spread your butternut squash cubes and chopped onion on a large baking sheet. Drizzle with olive oil. Toss with fresh herbs, salt and pepper.
Roast at 425 degrees for 25 minutes or until squash is tender.
Make your crust and prebake if necessary.
Drizzle crust with a little bit of olive oil.
Spread arugula and spinach over crust.
Top greens with roasted butternut squash/onion mixture.
Sprinkle cheeses over squash mixture.
Bake in oven, until cheese is melted and crust is done.
Maria's Recipe for Roasted Butternut Squash Pizza
Wednesday, November 18, 2009
2 Thanksgiving Sides- Autumn Hash and Vegetable Trio with Orange-Thyme Dressing
 I love roasting vegetables. I truly believe that any vegetable can taste delicious if you roast it in the oven with a little bit of olive oil, salt and pepper. It's true for brussel sprouts, parsnips, beets, cauliflower, etc. I could give millions of examples.
I saw a couple of recipes in the Thanksgiving issues of food magazines and these 2 side dishes really looked delicious. I decided to try both of them and see if they would be a great addition at a Thanksgiving dinner. Both of these would be great for a special occasion, but I also think they would be great anytime. Delicious.
The first recipe comes from Bon Appetit and I thought it looked beautiful with all the different colors and I loved that they included the beet greens, mixing them in with the oven-roasted vegetables. The original recipe calls for potatoes, sweet potatos, yams, baby golden beets, and butternut squash. I changed it a little bit and decided to use red potatoes, butternut squash, golden and red beets. The fresh herbs it uses are oregano, Italian parsley, and rosemary.
I couldn't find baby beets, so I just used normal sized beets and cut them into small pieces.
This was really delicious and a great way to get more vegetables on the table!
Recipe for Potato and Autumn Vegetable Hash
The second recipe I found in Ladies Home Journal. It combines acorn squash, carrots, and beets. It also has a fabulous dressing that combines thyme (one of my fave herbs) and orange juice/zest. Delicious! The thyme and orange really go great together and make these vegetables taste amazing.
Spice up your thanksgiving table by adding some delicious color and nutrition with roasted vegetables!
Recipe for Vegetable Trio with Orange-Thyme Dressing
Recipe for Potato and Autumn Vegetable Hash
Thursday, November 5, 2009
CEiMB-(rewind) Tuscan Vegetable Soup
 Tuscan Vegetable Soup is not this week's recipe for Craving Ellie in my Belly. This week I was supposed to make Linguini with Shrimp.
Well, sometimes it just doesn't happen.
I didn't get to this soup in the middle of October for some reason, but saw that everyone was completely raving about it.
I decided to go back and make it, because it looked really easy, delicious and was getting rave reviews from everyone. It was chosen by Pam over at Lobster and Fishsticks, find her post about it here.
I made it when my mom was here visiting and it came together in a flash. We had been out at the park and got back home really close to dinner time. I couldn't believe how quickly this soup came together. It really is a simple soup, but it was really full of flavor and vegetables. My mom really liked it and so did the kids.
So, since it is soup weather right now, I encourage you to make this soup.
If you are feeling like shrimp is a better option, then go check out the CEiMB Blogroll to see what everyone thought about the linguini.
Recipe for Tuscan Vegetable Soup
Wednesday, April 1, 2009
Quinoa Risotto with Hazelnuts

You might be getting sick of seeing quinoa on my blog, but guess what- it isn't going to stop. I love it! It has become a quick standby, main dish, side dish, I even made a muffin with leftover cooked quinoa. It is everywhere.
I really like trying different types of risotto and I find it really interesting when they call for unusual grains, like quinoa.
This was a really great risotto. The vinegar added a really great flavor and the herbs were great.
I love fresh thyme- it is so pretty and makes a great garnish. I skipped the creme fraiche, but the hazelnuts added a really nice crunch on top.
Gotta go get some quinoa and try it out!
Quinoa and Onion Risotto with Crème Fraîche and Hazelnuts adapted from Cooking Light
1 1/2 cups uncooked quinoa
6 cups water
1 teaspoon salt
2 thyme sprigs
1 bay leaf
1 teaspoon butter
1 1/2 cups finely chopped Oso Sweet or other sweet onion
2 tablespoons white wine vinegar
3 tablespoons crème fraîche
3 tablespoons chopped hazelnuts, toasted
Place quinoa in a fine sieve; place sieve in a large bowl. Cover quinoa with water. Using your hands, rub grains together for 30 seconds; rinse and drain. Repeat procedure twice. Drain well.
Combine 6 cups water, salt, thyme, and bay leaf in a large saucepan; bring to a simmer over medium heat. Cover and cook 5 minutes; discard thyme and bay leaf.
Keep warm over low heat.
Melt butter in a medium sauté pan over medium heat. Add onion, and cook for 10 minutes, stirring frequently. Add quinoa; cook 2 minutes, stirring constantly.
Add warm seasoned water, 1/2 cup at a time, stirring frequently until each portion of warm seasoned water is absorbed before adding the next (about 30 minutes total).
Stir in vinegar.
Spoon 2/3 cup risotto into each of 6 small bowls or plates; top each serving with 1 1/2 teaspoons crème fraîche.
Sprinkle each serving with 1 1/2 teaspoons hazelnuts.
Coming Tomorrow- Chicken Blueberry Salad
Tuesday, March 17, 2009
TWD-French Yogurt Cake with Marmalade Glaze and Green Egg and Ham Cups for St. Patricks Day!
 Today's Tuesdays with Dorie recipe, French Yogurt Cake with Marmalade Glaze, was chosen by Liliana over at My Cookbook Addiction. Mine don't look like a yogurt cake with glaze because I chose Dorie's Riviera version which uses greek yogurt or strained plain yogurt, olive oil and then either rosemary or mint. I had fresh rosemary and wanted to try these with the minced rosemary mixed in with the sugar and zest. I decided to make these in a muffin tin so they would bake faster (20 minutes) and for portion control. The overall taste was wonderful. My 2 year old really liked them-she ate more than her fair share, but I guess that is my fault for leaving them right within her reach on the countertop. The combination of the lemon and rosemary in a sweet muffin/cake was very good. Go check out what the rest of the TWD bakers did by checking out the TWD Blogroll!
 I also made Green Egg and Ham cups because my kids love green eggs and ham. I only do this on St. Patricks Day because I think it looks sort of digusting, but the kids love it. Usually I just do scrambled eggs and add green food coloring and ham, but this time I decided to bake them in the oven and I added spinach and thyme. The ham sunk to the bottom but that didn't matter, the kids loved them. Happy St. Patricks Day- I hope you are wearing green!
 Green Egg and Ham Cups by Mary Ann
10 eggs
6-8 drops of green food coloring
1/2 cup shredded cheese
salt and pepper
1 cup cubed ham
baby spinach leaves
fresh thyme
Preheat oven to 400 degrees F.
Whisk eggs in a large bowl. Drop in food coloring and whisk until combined. Add cheese; season with salt and pepper and add ham. Stir well.
Spray a muffin tin with cooking spray or brush with melted butter. Scoop 1/4-1/3 cup egg mixture into each cavity of the muffin tin. Place a couple of spinach leaves in each cavity and submerge with your finger or a spoon. Sprinkle fresh thyme leaves on top.
Bake for 11-13 minutes. Cups will be puffed and cooked through.
 Coming Tomorrow- Fried Egg and Polenta Stacks with Sauteed Spinach and Pesto
Wednesday, February 25, 2009
Pork Tenderloin with Blueberry Sauce
 We have a winner! I went to random.org and used their random number generator to chose a number between 1 and 65. The winner was #4-Anna. she said "I truly love all seasons but down in the southern hemisphere we have had a bit of wild hot weather so I am looking forward to Winter this year - slow cooked roasts, steamy soupy laksas on Sunday afternoons, homemade baked beans and pork sausages and Mum's bottled Summer fruits are always beautiful in the winter, warmed and served with hot custard." Congrats Anna and thanks everyone who entered the giveaway!
Now on to the food.
This dinner caught my eye when I was flipping through a magazine at the grocery store. I usually skip to the back of any magazine that I know features recipes and try to see if there is anything worth making. This issue of Family Circle had quite a few healthy meals that looked really great. I have never made a blueberry sauce to accompany meat, so I thought this would be a great recipe to try out on my family.
I was a little suspicious of the blueberry sauce, because it smelled so much like vinegar, but everyone agreed that the sauce and the pork really complimented each other and it tasted delicious.
It called for green beans to roast alongside the pork, but I couldn't find any good looking fresh green beans, so I just substituted Kale and turned it into Kale Chips. I also served sauteed Kale with Bell Peppers on the side, because we just really love Kale around here. Does your family love Kale? Pork Tenderloin with Blueberry Sauce from Family Circle Magazine
Prep: 15 minutes Cook: 8 minutes Roast: 25 minutes
Ingredients
1 pork tenderloin (about 1-1/4 pounds)
2 teaspoons sodium-free chicken grilling blend (such as Mrs. Dash) (I used McCormick grill seasoning)
1/2 teaspoon salt
1/2 teaspoon black pepper
12 ounces green beans, ends trimmed (I used kale instead)
1 tablespoon olive oil
1 small onion, chopped
1-1/2 cup frozen blueberries, thawed
1/4 cup cider vinegar
1 teaspoon sugar
1/2 teaspoon dried thyme
Directions
1. Heat oven to 400°F. Rub pork with chicken seasoning and 1/4 teaspoon each salt and pepper and place in a roasting pan. Roast at 400°F for 25 minutes, until internal temperature registers 155°F.
2. When 10 minutes of cooking time remain, remove pan and spread green beans around pork; drizzle with 1/2 tablespoon olive oil. Stir beans and return pan to oven.
3. Heat remaining 1/2 tablespoon olive oil in a small saucepan over medium-high heat. Cook onion 3 minutes. Add blueberries, vinegar, sugar, thyme and remaining 1/4 teaspoon each salt and pepper to saucepan; cook for 5 minutes or until thickened. Serve pork with sauce.
Up Tomorrow-Barefoot Bloggers- Meringues with Pomegranate Gelato
Wednesday, January 7, 2009
Roasted Vegetable Gratin
 Basically if I see a recipe that has butternut squash in it, I am determined to make it. My family has started teasing me about it, because we eat alot of squash. What can I say? It is delicious. I saw this beautiful dish in Family Circle and immediately put it on the menu. It was delicious. Wonderful. I love roasted vegetables and polenta. Yum. Yum. Yum.
 Roasted Vegetable Gratin from Family Circle Magazine
Ingredients
1 small butternut squash (about 2-1/2 pounds), peeled, seeded and cut into 1-inch pieces
2 medium parsnips (about 1 pound), peeled and cut into 1-inch pieces
1 large sweet red pepper, cored, seeded and sliced into 1/4-inch strips
1 medium red onion, peeled and cut into 1-inch wedges
2 tablespoons olive oil
1/2 teaspoon salt
1/4 teaspoon black pepper
1 tube (18 ounces) heat-and-serve polenta
1/4 cup half-and-half
1/2 cup shredded Asiago cheese
8 sprigs fresh thyme
Directions
1. Heat oven to 375°F.
2. Toss squash, parsnips, red pepper and onion with olive oil, salt and pepper. Place vegetables in a large roasting pan and roast at 375°F for 45 minutes, stirring twice.
3. Coat a 13 x 9 x 2-inch baking dish with nonstick cooking spray. Slice polenta into 12 slices, each about 1/2-inch thick. Fit slices into the bottom of the baking dish.
4. Spoon vegetables over polenta slices. Drizzle with half-and-half and sprinkle with cheese. Scatter thyme over top.
5. Bake at 375°F for 20 minutes or until bubbly. Allow to cool slightly before serving.
Up Tomorrow- Barefoot Bloggers-Banana Sour Cream Pancakes and Craving Ellie- Fried Rice with Scallions, Edamame and Tofu
Thursday, December 11, 2008
Craving Ellie- Roasted Ratatouille Tart and Barefoot Bloggers- not quite Coq Au Vin


 This weeks Craving Ellie recipe-Cornmeal Crusted Roasted Ratatouille Tart was chosen by Nina over at The Wiivers. Thank You Nina- this is one tasty tart. I love vegetables, especially when they are roasted and this was full of them. The crust was very rustic and grainy. I made it in a springform pan and used some summer squash along with my zucchini. I didn't roast my tomatoes along with the other veggies, because I like them to be a little firm. And luckily, we are still using the last tomatoes from the garden that have been hanging out in the garage-it's nice and cool in there! This was beautiful and delicious. It tasted great cold, too. Go check out what the other Ellies thought by checking out the Craving Ellie Blogroll!
This week's Barefoot Bloggers recipe, Coq Au Vin, was chosen by Bethany of this little piggy went to market. You can grab the recipe on her blog or by clicking HERE.
I really had every intention of making it as is, but was crunched for time and I don't have any alcohol of any sort in the house, not even to cook with, so when I got down to it,I made my own take on the recipe- Chicken with Carrots and Mushrooms, in Thyme Gravy. It was yummy and alot quicker. To see the other BB dishes check out the Barefoot Bloggers Blogroll!


 Chicken with Carrots and Mushrooms, in Thyme Gravy by Mary Ann
2 large chicken breasts, bone-in and skin-on
4 cups chicken stock or broth
20 sprigs fresh thyme
2-3 large cloves of garlic
2 large carrots, peeled and cut in circles
8 oz sliced mushrooms
1 1/2 Tbls unsalted butter
3 Tbls flour
salt and pepper
In a large electric skillet with a lid, place the two chicken breasts, bone down. Pour 2 cups of chicken stock over the chicken breasts. Season with salt and pepper, and add 15 springs of fresh thyme. Use a garlic press to mince the garlic into the stock. Turn on the skillet to med-high and cover. After a few minutes, stir in the carrot circles. Cover and let cook.
Meanwhile, in a small saucepan, melt the 2 Tbls butter over medium heat. Whisk in the flour and cook for 1 minute, whisking continually. Pour in the remaining 2 cups chicken stock, in a steady stream, whisking continually. Continue to whisk and bring to a bubble. Season with salt and pepper and fresh thyme, removing the thyme from the sprigs. This mixture should thicken a little. Remove from heat and set aside.
Stir the sliced mushrooms into the chicken-carrot mixture and cover. Let cook for 5 minutes. Remove the chicken to a cutting board. The chicken should be almost completely cooked. Remove the skin and debone the chicken. Put chicken back into the carrot-mushroom mixture and cut into smaller pieces.
Pour the thyme gravy into the chicken-carrot mixture and stir. Cover, and let cook until chicken is cooked through and gravy is thick. Serve as is or over noodles.
Cornmeal-Crusted Roasted Ratatouille Tart from The Food You Crave by Ellie Krieger
For crust:
For crust:
2/3 cup yellow cornmeal
1/3 cup whole-grain pastry flour or whole wheat flour
1/4 teaspoon salt
2 tablespoons butter
2 tablespoons canola oil
3 tablespoons water
For filling:
For filling:
2 tablespoons plus 1 teaspoon olive oil
2 shallots, thinly sliced (about 1/3 cup)
Cooking spray
1/2 pound thinly sliced eggplant rounds (about 1/3 medium eggplant)
1 zucchini, sliced into 1/8-inch rounds (about 8 ounces)
3 medium tomatoes, sliced thinly
1/4 teaspoon salt
1/4 teaspoon freshly ground black pepper
3 ounces shredded part-skim mozzarella cheese
1/4 cup shredded fresh basil leaves
1/4 cup freshly grated Parmesan
To make crust—Preheat the oven to 350 degrees F.
Combine cornmeal, pastry flour, and salt in the bowl of a food processor. Pulse to incorporate. Add butter and oil and pulse about 20 times, until mixture resembles small pebbles. Add water and pulse until mixture forms a loose dough. Remove dough from processor and press into bottom and about 1/8-inch up the sides of a 9-inch tart pan with a detachable rim. Press aluminum foil into the bottom and sides of the pan on top of the dough and weigh down with uncooked rice or pie weights. Place tart pan on a baking sheet and bake for 10 minutes. Remove from oven and remove rice and foil. Return to oven and bake for an additional 5 minutes, or until no longer shiny and wet. Remove from oven and let cool.
To make filling—Increase the oven to 400 degrees F. Heat 1 teaspoon of olive oil in a nonstick pan over medium heat; saute shallots until soft, about 5 to 6 minutes. Spray 2 baking trays with cooking spray. Arrange the eggplant, zucchini and tomato slices on the trays in a single layer and brush with the remaining olive oil. Season with salt and pepper, and roast the vegetables until soft but not browned, about 15 minutes. Remove the vegetables from oven and cool.
Lower the oven temperature to 350 degrees F. Lay the eggplant slices in 2 layers on the bottom of tart; cover with 1/3 of the mozzarella cheese and some of the shredded basil. Add the zucchini and shallots, top with another 1/3 of the mozzarella and basil, then the tomatoes. Top with rest of the mozzarella cheese and the Parmesan. Bake for 25 to 30 minutes, or until cheese is melted and vegetables have further wilted. Remove from oven, let cool for 5 minutes, and cut into 8 slices. Serve warm.
Coming Friday- Gingersnap Pancakes
Subscribe to:
Posts (Atom)


