
 For the past couple months, I haven't been consuming refined sugars. I will admit that I had a slice of this pie (sans the coconut) that I made on Thanksgiving and tasted a cookie or two over the Christmas Holidays, but for the most part, I haven't been eating it. I haven't been baking very much. I still make my kids cookies or muffins occasionally, but I don't always consume what I make. I also have been experimenting with other ways to enjoy sweet treats.
We are big LARABAR fans in this house. If you are familiar with those, you know that they can be a little bit pricey. Especially when a certain 9 year old wants to eat one- every. single. day. *sidenote- his favorite flavors are - Coconut Cream Pie, Cashew Cookie, and Chocolate Coconut Chew :D
I have seen multiple recipes for Homemade LaraBars and so, I bought a huge bag of dates a few weeks ago.
Long story short- These little Date Chocolate Nut Balls were the first thing that I made with my dates. They are kinda like little nuggets of a LaraBar.
These little treats are so good. They are just sweet enough to qualify as a treat and the perfect way to top off a meal. I made them when I was taking dinner to someone and kept quite a few for us. We have been enjoying them as snacks straight from the freezer. I worked out the calorie info and each one has about 40 calories. I will be making these over and over again.
Here is the recipe for Date Chocolate Peanut Butter Balls
* I used a mixture of cashews, pecans, almonds, and hazelnuts instead of peanuts
* I used unsweetened coconut milk instead of water, just because I had it in the fridge
Wednesday, January 25, 2012
Date Chocolate Nut Balls
Friday, September 16, 2011
Panko Crusted Salmon
 My husband came home from work the other night with wild caught salmon from Alaska. He explained that one of his patients had gone on a fishing trip and decided to share the catch. He handed me a bag that contained vacuum packed servings of the beautiful salmon and I tried to keep from jumping up and down with excitement.
Salmon can get a little bit pricey sometimes, so I was more than grateful for this lovely gift.
I have been wanting to try this particular recipe for quite a while, but salmon has been too expensive. This recipe is so easy, but so delicious. A few ingredients really gave this salmon great flavor. You mix panko crumbs, lemon zest, fresh parsley, and a little salt and pepper and then brush the salmon with dijon mustard. The panko mixture is pressed onto the salmon and it is cooked for a few minutes in a little bit of hot oil. The salmon is than transferred to the oven where finishes cooking to perfection. My entire family loved this dish. It was soo good.
Panko Crusted Salmon from The Barefoot Contessa's How East Is That?
2/3 cup panko
2 tbsp. finely minced fresh parsley
1 tsp. lemon zest
½ tsp. kosher salt
½ tsp. ground black pepper
3-4 tbsp. olive oil, divided
4 (6-8 oz.) salmon fillets, skin on
2 tbsp. Dijon mustard
Lemon wedges, for serving
Preheat the oven to 425˚ F. In a small bowl, combine the panko, parsley, lemon zest, salt and pepper. Drizzle with 2 tablespoons of the olive oil and toss with a fork until the crumbs are evenly coated; set aside.
Place the salmon fillets skin side down on a work surface. Generously brush the top of each fillet with the mustard and then season with salt and pepper. Press the panko mixture thickly on top of the mustard on each fillet to help the panko adhere.
Heat the remaining olive oil over medium-high heat in a 12-inch oven-safe skillet. When the oil is hot, add the salmon fillets, skin side down, and sear for 3-4 minutes without turning to brown the skin.
Transfer the pan to the preheated oven for 5-7 minutes, until the salmon is almost cooked through and the panko is browned. Remove from the oven, cover with foil and let rest 5-10 minutes. Serve warm with fresh lemon wedges.

Friday, September 2, 2011
Mini Cheeseburger Salad with Yellow Mustard Vinaigrette
 I first made this salad a few years ago and it was an absolute hit. I made it for my family, made it for potluck dinners, made it for company, and shared the recipe with friends. It takes everything that is delicious about a cheeseburger and makes it even more delicious.
You make little burgers, along with a delicious mustard vinaigrette and they are layered on a bed of romaine, cherry tomatoes (I still have some growing in my garden!), and sliced dill pickles. My whole family loves this one, even me.
Here is the recipe for Mini Cheeseburger Salad with Yellow Mustard Vinaigrette
* I used mild cheddar to top my mini cheeseburgers
* I used ground sirloin for the burgers
Tuesday, September 28, 2010
Greek Night- 2 dips, soup, salad, appetizer, main dish, drink and dessert
 A couple of weeks ago my son studied Ancient Greece at school. He had multiple options for his final project and we decided to have a "Greek Cafe" as part of the experience.
When I was a kid, I used to love to do restaurants to surprise my dad when he would come home from work, so I knew this would be really fun for all of us. The kids dressed up and placed all the appropriate signs annoucing our cafe. The cutest part was how they thought that someone driving down our street might just be hungry and stop in to join us.
 My son made the signs and came up with the name for our cafe. I asked for his input on the menu and spent the afternoon getting all the dishes ready for our Greek Night.
 We started with a drink called "The Greek Lantern". I have absolutely no idea if it is really a Greek drink, but it sounded really interesting, combining a large amount of fresh parsley leaves, lime juice, lime zest, club soda, water and ice. It actually was quite refreshing and surprisingly yummy.
 Next we had a Roasted Red Pepper with Feta dip and Lemony-Garlic Hummus with homemade pita chips. Both of these were really good, although the red pepper one was deemed "spicy" by my youngest child.
 Then we had mini spanakopita, which were really delicious and not as time consuming as I thought they would be.
 The soup was everybody's favorite. I have had it at Greek restaurants before and it was very simple to recreate at home. It is called Avgolemono Soup- which just means Egg, Lemon and Rice soup. You have to temper eggs to make it, but boy was it delicious. My kids loved it.
 I made a light version of Baklava that I found from Cooking Light. It was also much easier than I thought it was going to be to make. It turned out good, but was quite sweet, so could only be enjoyed in small portions. I actually had some leftover baklava mixed into this lemon ice cream a few days later and that was an amazing dessert.
 What Greek menu would be complete without some sort of Greek salad? I actually made 2 versions of this salad since we have two people in our house who don't like tomatoes. The second version I made with chopped red pepper to replace the tomato. These leftovers were delicious on a green salad and also in a pita sandwich.
 We had Chicken Souvlaki skewers, which my son loved. The Tzatziki sauce that went along with this was my youngest child's favorite thing. She was eating it plain and dipping all sorts of veggies in it.
Here's a closer look at the Baklava. We had lots of fun on Greek Night!
- 1 cup (packed) Parsley Sprigs
- ½ tsp Lime Zest, grated
- 1 cup Cold Water
- ½ cup Fresh Lime Juice
- ½ cup Sugar
- 1 (10 ounce) bottle Club Soda
- Blend all the ingredients, except club soda, in a blender, for about one minute.
- Take a large glass measure and strain the preparation through a fine-mesh sieve.
- Put ice into tall glasses and pour the prepared drink.
- Top with club soda and serve
Lemony-Garlic Hummus
Recipe from Aggie’s Kitchen
2 16 oz cans of chickpeas (Bush’s is my canned bean of choice!)
1/2 cup liquid from can of chickpeas
juice and zest from 3 lemons
3 TB tahini
4 cloves garlic, crushed
big pinch of salt and fresh ground pepper
5 TB olive oil
Combine first 6 ingredients into bowl of food processor. Blend for 2-3 minutes until smooth. Slowly stream in olive oil until combined and smooth. Taste for salt and add more if needed. Serve with fresh cut veggies, crackers, chips, pita chips or crostini for a nice appetizer platter.
Note: this recipe makes a large batch. Store in airtight container in refrigerator for up to a week.
Recipe for Greek Salad
* I drastically reduced the amount of olive oil and feta cheese that this recipe called for. I just drizzled the mixture with a little olive oil and then used more lemon juice. I only added a couple of oz of feta cheese.
Recipe for Mini-Spanakopitas
* the egg white/olive oil mixture they said to brush the phyllo dough with, didn't work for me.
I used cooking spray instead.
Recipe for Avgolemono Soupo (Egg, Lemon, and Rice Soup)
Recipe for Chicken Souvlaki with Tzatziki Sauce
* I used greek yogurt
Recipe for Baklava with Wildflower Honey
* I used orange blossom honey
Wednesday, September 8, 2010
Purple-eyed Peas and Spinach

I don't know what to call this, so if you can think of a better name for it, go ahead and call it whatever you want. All I know is that it was really delicious.
I did something I have never done before in order to make this dish. I bought real bacon. I was at the Farmer's Market and a man talked me into buying these beautiful, fresh purple-eyed peas. But, since I am not a Southerner, I wasn't really sure what to do with them. I had never had fresh any color-eyed peas.
The man told me to cook them with a piece of fatback and I said "What?", because I don't know what fatback is and I really don't want to know. I knew that wasn't happening. Someone else mentioned a ham hock, but once again, not familiar with that.
I decided I would make my family happy and buy bacon. I know it can give great flavor to things, even though I prefer not to cook it or use it. I guess this was a special occasion.
We enjoyed this dish with Roasted Shrimp
and fresh corn on the cob.
Purple-eyed Peas and Spinach by Mary Ann
4 slices thick cut bacon
1 red onion, minced
1 clove garlic, minced
1 red bell pepper, minced
1 green bell pepper, minced
1 6-oz bag baby spinach
1/2 cup chicken broth- give or take
4 cups purple-eyed peas (you could use 2 15-oz cans drained, rinsed black-eyed peas)
1/2 cup chopped Italian parsley
salt and pepper
If you have fresh purple-eyed peas, put them in a large pot with double the amount of water as peas. Bring to a boil. Reduce heat and cook for 30 minutes, mostly covered.
Drain and set aside.
In a large saute pan, cook 4 pieces of bacon over medium-high heat until nice and crispy. Remove the bacon to a plate covered with a paper towel and drain the bacon grease, but do not wipe out the pan.
Add the red onion to the pan and saute for about 5 minutes. Add the garlic and saute for 1 minute. Add the red and green peppers and cook for about 3 minutes.
Add baby spinach and cook until wilted.
Add chicken broth and season with salt and pepper.
Let cook for a few minutes.
Stir in purple-eyed peas and remove from the heat.
Stir in chopped parsley.
Crumble bacon and sprinkle on top.
Thursday, July 22, 2010
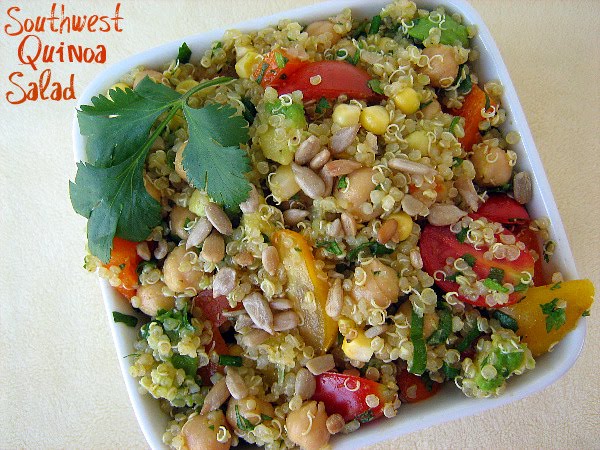
Southwest Quinoa Salad
 One of my favorite bloggers recently started a new blog. I loved her old blog, Cafe Johnsonia
(which she has kindly left up so people can still use her recipes) but, I really, really love her new blog- Fresh Clean Start.
It's all about getting to a healthier place and I absolutely love every single post.
When I saw her post about this Quinoa Salad, I could not wait to put it together.
I made this salad for our 4th of July get-together and since the recipe written was enough to serve 1-2 people, I at least quadrupled the salad ingredients, so that everyone could have some and hopefully there would be some leftover for me to eat for lunch sometime during the next week.
I cooked up a bunch of quinoa (something I always do, so that there will be enough for whatever I need during the week) and started chopping my veggies.
I used fresh corn on the cob that I got from the Farmer's Market and I also used some heirloom cherry tomatoes.
I added cumin, chili powder, paprika, and lime juice- tasting it along the way- until it was just right.
I really didn't know how well it would be received at our dinner, but many people really, really liked it. This made me happy, but also limited the amount of leftovers. Luckily, there was enough leftover for lunch one day and I served it over a big pile of salad greens as Lindsey suggested.
This really is so, so good and good for you. I can't wait to make a big batch of it again.
Recipe for Southwest Quinoa Salad
* I used heirloom cherry tomatoes
* I used fresh corn on the cob
* I sprinkled sunflower seeds on top
Saturday, May 29, 2010
Almond Butter Snickerdoodles
 Have you tried freshly ground almond butter? It is soooo good.
A couple of months ago a friend asked me what kind of peanut butter I used. She told me she got her's from Earthfare, where it is freshly ground from peanuts. Just plain peanuts. No added oil, sugar, salt, etc. like you find in all the jars that are commercially packaged.
I went to check it out and was surprised by the price, which was so much lower than all the packaged peanut butters. Plus, the taste was unbelievable. Probably because it was really just peanuts. Funny how that works. You can even grind your own into a little plastic tub and watch the peanuts being turned into peanut butter. Point of story- It is the only peanut butter I use. I eat a little bit of it daily. It is so good.
So, they also have freshly ground almond butter, which is a little bit more expensive, but oh so divine.
I saw this recipe in Cooking Light for Almond Butter Snickerdoodles and decided it was a great way to use a little of the almond butter.
These cookies are superb. Not the traditional flavor of a snickerdoodle, but so much more complex and I think, so much better. There is lemon zest, whole wheat flour, and cinnamon- which all combine for a perfectly chewy cookie. The almond butter adds a delicious layer of flavor.
My entire family loved these cookies. Even my husband- He couldn't tell they were "healthier".
Can't wait to make them again.
Recipe for Almond Butter Snickerdoodles
* the recipe said to use "smooth" almond butter, but I used the freshly ground kind which has a slightly chunky texture and they turned out great
Tuesday, May 4, 2010
Baked Penne with Roasted Vegetables

I love browsing through cookbooks. A few weeks ago we were at a book store and I was thumbing through one of Giada's cookbooks, I don't remember which one, but I saw this recipe for pasta with roasted veggies.
I love roasted veggies. It is the best way to eat any vegetable, in my opinion.
My parents and brother were still here when I made this pasta dish and it was really good.
I made a couple of changes to the recipe, but they were small ones. I subbed in asparagus for the mushrooms, mostly because asparagus was really cheap and my family loves it and because mushrooms aren't my favorite.
I also used whole wheat pasta because I always do and my family likes it.
I didn't use smoked mozzarella because it was too expensive for me to buy, but I am sure that adds something special to the flavor of this dish. I just used mozzarella.
The leftovers were fabulous. My brother and I were fighting over them to the very last bite.
Recipe for Baked Penne with Roasted Vegetables
* I used 1 lb of asparagus instead of the mushrooms
*I used regular mozzarella instead of smoked
*I used whole wheat penne
Wednesday, April 14, 2010
Simple Roasted Asparagus
 I have mentioned before that any vegetable is delicious when you roast it in the oven. It really is true.
I have roasted asparagus in the oven quite a few times and decided to roast some for our Easter dinner since it is in season right now and very affordable.
Plus my 5-yr old daughter has decided that asparagus is her favorite vegetable and so we have to have it at least once a week.
Preparing asparagus this way couldn't be easier. It does take a few more minutes than steaming or blanching, but you won't end up with limp, soggy asparagus if you leave it in the oven for an extra minute as opposed to the other ways of preparing it.
The texture is better because it still has a little bit of crispness to it, but it is completely tender at the same time.
You could also use other seasonings, like garlic, chili flakes or other herbs if you wanted to.
There were a few people at Easter dinner who hadn't tried asparagus this way who were quite intrigued by the method since it produced such delicious results.
Roasted Asparagus by Mary Ann
1 lb asparagus, rinsed and woody stems removed
1 Tbls olive oil
kosher salt
fresh ground black pepper
1/2 lemon
Heat oven to 450 degrees.
Place asparagus on baking sheet in a single layer. Drizzle with olive oil. Season with salt and pepper. Toss to coat evenly.
Roast in oven for 12-14 minutes, or until asparagus stems are tender when poked with a fork.
Squeeze lemon juice over asparagus and serve.
Tuesday, March 16, 2010
Egg in a Basket with Turkey and Asparagus
 We eat a lot of asparagus. It is one of the veggies that my kids always ask me to buy, which I think is a little strange because I can remember hating it when I was a kid. Of course I have never told them that, I just buy it, cook it and we all eat it.
When I saw the picture for these Egg in a Basket's' in Ellie Krieger's new cookbook, So Easy, I couldn't wait to make them. They were in the breakfast section of her book, but we had them for dinner.
My mom always used to make the egg in a basket part when I was growing up, so I thought they would be even more delicious with the addition of turkey and asparagus.
They were so good. We all loved them.
I cooked my eggs longer than the recipe said to, because I don't like runny yolks. I made sure my yolks were completely cooked. That is just my personal preference. Feel free to cook your eggs however you want. I know there must be someone out there who likes having the yellow runny stuff all over their plate. They just don't live here.
The best part is the little round cutout of bread that gets all crispy and delicious. We are going to be having this meal again for sure.
oh, and Happy St. Patrick's Day a couple of hours early. We are going to have our traditional green eggs and ham, but this year we are going to have them on homemade biscuits. Not to mention a lovely spinach/arugula salad.
And we are making homemade Mint Chocolate Chip Ice Cream with fresh mint. I can't wait.
I hope you are wearing green and that you eat at least one green food tomorrow (later today)! Egg in a Basket with Turkey and Asparagus adapted from So Easy by Ellie Krieger
1 lb asparagus stalks, woody bottoms removed
4 pieces whole-wheat sandwich bread
4 teaspoons butter, melted
6 oz sliced deli turkey, sliced into thin ribbons
4 large eggs
1/2 teaspoon freshly ground black pepper
Steam or blanch the asparagus for a few minutes, until crisp tender.
Slice asparagus into pieces.
Using a 2 or 3-inch cookie cutter, cut a hole in the center of each slice of bread; reserve the cut-outs.
Spray a large nonstick skillet with cooking spray and set over medium-high heat. Cook the turkey slices until they are browned around the edges, about 3 minutes.
Add the asparagus and cook until heated through, about 2 minutes, then season with the pepper.
Transfer the mixture to a plate and cover with foil to keep warm.
Place 2 of the bread slices and cutouts in the same skillet and crack on egg into the hole of each slice.
Cook until the egg whites are set and the bread is toasted on the underside, about 3 minutes. Flip the bread slices and cutouts over and cook an additional minutes. Transfer to a plate.
Repeat with other bread slices, cutouts, and eggs.
Top each bread slice with 1/4 of the turkey/aspargus mixture and a cutout.
Monday, February 22, 2010
Roasted Green Cabbage Wedges
 Okay, this is soo easy, it almost seems ridiculous to post about.
But, I never would have thought to roast green cabbage on my own, so when I flipped through the January issue of Martha Stewart Living and saw these gorgeous pieces of cabbage that had browned edges, I couldn't believe it.
This has got to be one of the simpliest recipes ever.
Cut a cabbage into wedges. Brush the wedges with olive oil. Season with salt and pepper. Roast in the oven, turning halfway through. Eat.
I mean, it really is just that simple.
My kids and I went crazy for this. We were all eating it with our fingers, holding the little piece of core and just gobbling it down.
The outside leaves were a little bit crunchy, but the inside was so tender, it basically just melted in your mouth.
It was really unbelievable how delicious this cabbage was.
Just be sure to leave the core intact when you are cutting your cabbage into wedges, so that your cabbage leaves don't fall off all over the place.
This is one that we are going to enjoy over and over again.
Roasted Green Cabbage Wedges from January 2010 Martha Stewart Living
Serves 8
1 small head green cabbage (about 2 1/2 pounds), cut into 8 wedges, core intact
1/2 tsp extra-virgin olive oil
salt and pepper
1 lemon, cut into wedges
Preheat the oven to 450 degrees F.
Arrange cabbage on a rimmed baking sheet. Brush both sides of wedges with oil. Season with salt and pepper.
Roast, flipping half-way through, until edges are brown and crisp, 25 to 30 minutes.
Squeeze lemons over cabbage.
Monday, January 11, 2010
Vegetarian Lasagna
 Because we went to DisneyWorld for Christmas, we had a family dinner with my husband's family the week before we left, to celebrate the holiday.
We decided on an Italian theme and I brought this lasagna.
This recipe is the lasagna that we ate growing up at my house and it is requested by one of my brothers every year for his birthday dinner.
It is really simple and loaded with vegetables. Even my meat loving husband really loves this lasagna.
The recipe calls for mushrooms, but this last time I made it, I forgot to buy mushrooms, so I just shredded a zucchini that I had in my fridge and sauteed that along with the veggies.
You could probably substitute whatever vegetables you wanted to, just saute them along with the onion.
It is healthier than normal lasagna because it has lots of veggies, but also because the filling is made with cottage cheese instead of ricotta cheese and there are less layers of noodles.
It was a big hit at our family dinner and is definitely a family favorite of ours.
This recipe can also be prepped in the pan and frozen for a later date. Just add a few minutes on the cooking time to make sure that it cooks and warms through.
Vegetarian Lasagna adapted from Managing your Meals by Winnifred Jardine
6 oz lasagne noodles, (6 noodles)
1 pd fresh spinach
1 Tbls olive oil
1 cup grated carrot (about 1 carrot)
1/2 cup chopped onion
1/4 pd sliced fresh mushrooms or 1 1/2 cups shredded zucchini
1- 15 oz can tomato sauce
1-6 oz can tomato paste
1-2 1/4 oz can sliced black olives, drained
1 tsp crushed dried oregano
1 tsp crushed dried basil
2 cups cottage cheese
1 egg, beaten
2 cups shredded mozzarella cheese
Cook lasagne noodles according to pkg directions. Meanwhile, rinse spinach and place in saucepan. Cover and cook over medium heat until steam forms, then reduce heat and cook for a few minutes. Drain and set aside. In a large heavy saucepan, heat oil and saute carrots, onion, and mushrooms, until tender but not brown. Stir in tomato sauce, tomato paste, olives, oregano and basil. set aside. Combine cottage cheese and egg.
In a 9 by 13 inch pan sprayed with cooking spray, layer half each of noodles, spinach, sauce, cottage cheese mixture, and shredded mozzerella. Repeat layers ending with shredded cheese. Bake at 375 degrees F for 30 minutes. Let stand 15 minutes before serving.
Friday, January 8, 2010
Risotto with Roasted Butternut Squash, Parsnips, and Turnips
 A couple of days before we left for DisneyWorld, I tried to use up the veggies that I had in my fridge and decided it was the perfect day for risotto.
The thing about risotto is that everyone thinks it is complicated for some reason. I used to think that and I don't even know why.
When I actually tried it and made it at home, I realized that it is easy.
You don't even have to stir it the entire time. You can walk away and do something else, come back, add more broth, stir, and do something else again.
It's easy; once you have tried it and once you make it at home, you will want to try it again.
I wanted to top my risotto with some roasted veggies and I had a butternut squash, turnips, and parsnips, so I decided that is what I would use.
I also used up the rest of my fresh herbs that I had on hand, which happened to be-sage, rosemary, and oregano. Thyme would also be tasty here or whatever herbs you like to use to flavor your veggies.
You could also use whatever combination of vegetables that you like- roasting them in the oven is the key.
I got my veggies in the oven and then started on my risotto. The veggies ended up being done just a few minutes before the risotto, so they were ready to serve at the same time.
I have also heard that risotto doesn't taste good warmed up or as leftovers. This is absolutely false, in my opinion. These leftovers were good cold, straight out of the fridge and tasted great warmed up too. Risotto with Roasted Butternut Squash, Parsnips, and Turnips by Mary Ann
Risotto:
1 Tbls olive oil
1/2 large white onion, chopped
2 cloves garlic, minced
1 3/4 cup arborio rice
6 cups low sodium chicken broth
1/4 t 1/2 cup freshly grated Parmesan cheese
salt and pepper
Roasted Veggies:
1/2 large butternut squash, peeled and cubed
2 parsnips, peeled and cubed
2 turnips, peeled and cubed
1 Tbls fresh rosemary
1 Tbls fresh oregano
1 tsp fresh sage
1 Tbls olive oil
Preheat the oven to 425 degrees F. On a large baking sheet combine your squash, parsnips, turnips and chopped herbs. Drizzle with olive oil and toss.
Roast for 25 minutes or until tender.
In a large, heavy saucepan, or dutch oven type pan, over medium high heat, warm 1 Tbls olive oil.
Add onion and saute until soft and translucent, abt 5-7 minutes. Add garlic and cook for 1 minute.
Add rice and stir, for about 2 minutes, making sure that the rice is mixed with the onion and coated with oil.
Add 1 cup of chicken broth and stir.
At this point you can stir continuously, or make sure you stir every few minutes.
Add 1/2 cup to 1 cup chicken broth, once the rice has absorbed the broth that is already in the pan. Continue to stir and add broth, until the rice is creamy and all the broth has been absorbed.
This process should take about 25-30 minutes.
Grate fresh Parmesan into your risotto until it melts and is combined evenly.
Season with salt and pepper, to taste.
Scoop the risotto into bowls and top with the roasted veggies.
Thursday, January 7, 2010
Kale Chips
 I know that everyone gets different cravings.
Some people crave chocolate, some crave sweets. Then there are people who crave salty or spicy.
I have never been one who craves salty foods, but my younger sister would take french fries or potato chips over a chocolate bar, any day.
Not that she eats french fries or potato chips everyday, but Santa used to bring her a big bag of Lays Potato Chips on Christmas day, while my older sister and I would get chocolate covered donuts or something.
The point is, we all crave certain things and there is a solution to solving your salty craving.
If you don't have a salty craving, here is a healthy snack that you will love anyway.
I first tried Kale Chips after reading the Dinner Dairies-Raising Whole Wheat Kids in a White Bread World. One woman's story about how she tried to change the way her family ate by making their meals more healthy, local, humane, etc.
It is a great book and Betsy Block, the author, includes recipes along with her story. You can see a couple of the other recipes I tried HERE, the same post where I talked about Kale Chips before.
I am telling you right now, there is no way that any one could not like this Kale. It absolutely transforms into something crispy and delicious.
My family plows through it and we have been eating these frequently, from the day I first tried them.
I love kale in lots of other ways, but if you are going to try it for the first time, try it this way.
I pretty much guarantee success. Kale Chips from The Dinner Diaries, adapted from Mollie Katzen's Vegetable Heaven
1 head curly kale
canola oil cooking spray
salt and pepper
Preheat the oven to 350 degrees F. (I sometimes preheat to 400 degrees)
Wash and dry the kale and then chop or tear it into medium-size pieces. Spread it out onto a nonstick baking sheet. Spray the kale lightly with oil, and then sprinkle with salt and pepper to taste. Bake for 15-17 minutes, until light and crunchy (check every few minutes and give the pan a little shake to avoid burning.
Wednesday, December 2, 2009
Cubano Sandwiches
 So what did I do with all the leftover Spice-rubbed Pork Loin? I know everyone out there has been dying to know. We could have just eaten it plain because it was so delicious, but in the November 2009 issue of Everyday Food, there was a recipe that called for the pork leftovers- Cubano Sandwiches.
I have never eaten a cubano sandwich or made one, but it looked like the type of meal my husband would love. Meat, more meat and cheese. Not to mention pickles and white bread.
I decided to give them a try, with a few healthy tweaks, of course.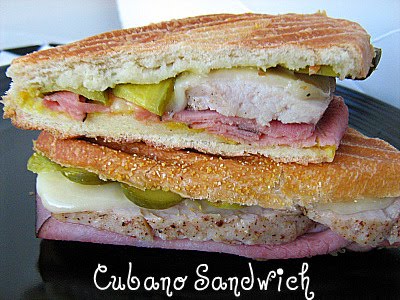 I completely omitted the butter from the recipe. Unless, I am baking or the butter actually plays an essential part in a recipe, I try to leave it out whenever possible.
I also reduced the amounts of meat, more meat and cheese that were on each sandwich. Usually when you see a picture of a cubano sandwich, the meat and cheese are piled high. I reduced it to just a slice or two of ham, one slice of cheese-cut in half, and two thin slices of pork.
Also, I was unable to find Portuguese rolls. I thought about making some, but decided to just use small hoagie rolls instead. I cut them in half, but not all the way through and then layered the sandwich fillings inside.
I also made these in my griddle/grill/panini press thing. Not sure what I mean? It is like this one, but a different brand. I basically just treated this sandwich like a panini and it was ready in minutes.
This was a hit with the entire family. Hubs loved it. Kids loved it. I even loved it. I would make the spice-rubbed pork again, just to make these sandwiches.
Cubano Sandwiches from Everyday Food November 2009
3 Tablespoons butter, room temperature (I omitted this)
4 Portuguese rolls, split (I used small hoagie rolls)
yellow mustard
1/2 pound thinly sliced deli ham (I used black forest ham)
1 pound Spice-rubbed Pork Loin, thinly sliced
1/2 pound Swiss cheese, thinly sliced
sliced dill pickles, to taste
1. Preheat oven to 425 degrees F. Butter inside of each roll (I skipped this step); spread with mustard. Divide ham, pork, and cheese among bottom halves of rolls. Top with pickles, more mustard to taste, and top halves of rolls.
2. Heat a grill pan and another heavy pan over medium. With a paper towel, lightly coat grill pan with butter. (I didn't do this) In batches, place sandwiches on grill pan and weight with second pan. Cook until bread is crisp on the outside, about 3 minutes per side; transfer grill pan to oven and bake sandwiches until cheese has melted, about 5 minutes. To serve, cut the sandwiches in half.
(I just used my 3-in-1: grill/griddle/panini press to make these. It is kind of like THIS Cusinart Griddler, but not that brand. I only had to put my sandwiches in my indoor grill/panini press and cook them until the cheese was melted. This eliminated some of the other steps)


