
 I have been meaning to make this ice cream for my husband for a long time. He loves chocolate chip cookies and I knew it would be something that he would love. I don't know why I put it off for so long, but finally, a couple of weeks ago, when we had some friends over for dinner, this ice cream was on the menu for dessert, along with this ice cream.
The reason this is double Cookie Dough Ice Cream is because the ice cream base tastes like cookie dough and there are chunks of chocolate chip cookie dough churned into the ice cream.
This was very popular. It practically disappeared a few minutes after being served. Everyone raved and raved about it and I know that I will be making it again.
Here is the recipe for Double Cookie Dough Ice Cream as seen on Annie' Eats, who used the cookie dough from The Perfect Scoop by David Lebovitz, ice cream adapted from Joy the Baker
Thursday, August 11, 2011
Double Cookie Dough Ice Cream
Friday, May 27, 2011
Strawberries and Cream Bars
 If only you could see the dreamy picture of these in the latest issue of Everyday Food. My picture just doesn't do it justice. In the magazine these are absolutely dreamy looking. High and cloud-like. I knew these would be the way I would use the rest of my freshly-picked strawberries.
The base is just a strawberry puree that is treated like a granita- scraped with a fork, until slushy. The top is a meringue/whipped cream mixture that really does remind me of a cloud. Soft and smooth.
Everyone in my family liked these bars. The only problem I had was that they were impossible to cut into squares directly from the freezer. I had to let them sit for a couple of minutes and soften a bit, so I could cut them. The strawberry layer also gets really hard if you prepare them in advance. We ended up letting them soften a little bit and then mixing them together in our individual bowls.
Strawberries and Cream Bars
adapted from Everyday Food
2 pounds fresh strawberries, hulled, halved if large (6 cups)
1 1/2 cups sugar
coarse salt
7 large egg whites
2/3 cup cold heavy cream
1 tsp pure vanilla extract
In a blender, combine the strawberries, 3/4 cup sugar, and a pinch of salt. Puree until smooth. Pour into a 9 x 13-inch baking dish. Transfer to freezer. Every 30 minutes, for 2 hours, scrape the fruit mixture with a fork until it’s thick and slushy. Smooth top with a rubber spatula.
In a large bowl, beat the egg whites on high until foamy. With mixer on medium, gradually add 3/4 cup sugar. Increase speed to high and beat until stiff, glossy peaks form, 3 minutes.
In another bowl, whip the cream and vanilla until you have stiff peaks. With a rubber spatula, gently fold the cream into the egg white mixture. Pour the cream mixture over the fruit mixture and smooth the top. Freeze until firm, about 4 hours (or covered, up to three days), before cutting into 12 squares.
Serves: 12

Sunday, October 31, 2010
Candy Corn Ice Cream

Happy Halloween!!!
Recipe for Candy Corn Ice Cream
from
Culinary Concoctions by Peabody
Friday, September 24, 2010
Lemon Ice Cream with Lemon Curd Swirl and Chewy Lemon Sugar Cookies
 It seems like I always have either leftover egg whites or egg yolks that I need to do something with. The whites usually go in the freezer until I accumulate lots of them because then I can make angel food cake.
I use the yolks within a few days and ice cream or pastry cream seem to be the easiest way to use them up. I had some leftover lemon curd that I had made for some mini cupcakes and since I really don't like to waste things like that, I was hoping I could incorporate it into whatever ice cream I decided to make. I also had tons of lemons, so lemon ice cream won out.
This recipe makes a deliciously tart and bright lemon ice cream. The lemon juice, zest and sugar are combined first and chilled. Then the egg yolks are tempered with the hot milk. After both of those components are thoroughly chilled, they are combined with the cream. The technique makes for a very smooth finished product. I swirled my leftover lemon curd into the ice cream base, after it was done churning. I thought this ice cream would be great for an ice cream sandwich so I searched until I found a chewy cookie that I thought would make a good base. I found this recipe on My Baking Addiction and Jamie said herself that she liked the lime version of this cookie better than the lemon, but I was willing to take my chances.
 These cookies were perfect for the ice cream.
 My son could hardly wait for the pictures to be taken because he really wanted to eat this ice cream sandwich.
 He begged me to take some photos of him "posing" with the dessert, so I did.
 He was not disappointed by this dessert in the least!
Ultimate Lemon Ice Cream from Tartlette
Finely grated zest of 3 lemons
1/2 cup fresh lemon juice
3/4 cup sugar or 2/3 cup agave nectar
4 egg yolks
pinch of salt
1 cup milk
2 cups heavy cream
In a non-reactive bowl, mix the lemon zest, juice and sugar (or agave nectar). Refrigerate one to two hours to blend flavors.
In a large bowl, slightly beat the egg yolks to break them up. Heat milk to barely boiling in a large heavy saucepan.
Whisk 1/4 of the milk into the egg yolks to temper them and then whisk in the rest of the milk. Return the combined mixture to the saucepan and gently heat (do not boil) until the mixture coats the back of a spoon.
Refrigerate for at least 2 hours.
Combine milk mixture with heavy cream and lemon mixture. Churn in your ice cream maker according to the manufacturer's directions.
Chewy Lemon Sugar Cookies as seen on My Baking Addiction
adapted from Rock Recipes
Ingredients
2 3/4 cups all-purpose flour
1 teaspoon baking soda
1/2 teaspoon baking powder
1/2 teaspoon salt
1 cup butter, softened
1 1/2 cups white sugar
1 egg
1/2 teaspoon vanilla extract
Zest of one large lemon, finely minced
4 tbsp fresh lemon juice
1/2 cup sugar for rolling cookies
Directions
1. Preheat oven to 350 degrees. Line cookie sheets with parchment paper.
2. In a small bowl, stir together flour, baking soda, baking powder and salt. Set aside.
3. Using a mixer, beat together the butter and sugar until smooth and very fluffy.
4. Beat in egg, vanilla extract, lemon juice and lemon zest.
5. Gradually blend in the dry ingredients.
6. Roll rounded teaspoonfuls of dough into balls, and roll in sugar. Place on lined cookie sheets about 1 1/2 inches apart.
7. Bake 8 to 10 minutes in the preheated oven, or until lightly browned.
8. Let stand on cookie sheet two minutes before removing to cool on wire racks.
Makes approximately 24-30 cookies depending on size
Thursday, August 26, 2010
Fig Giveaway! and Fresh Fig Ice Cream
 A couple of weeks ago I was contacted by Cristina, who asked me if I was interested in receiving a shipment of figs from the California Fig Advisory Board.
I thought it was very interesting that she contacted me just 1 day after my father-in-law left some fresh figs from his backyard at my house and the same day that I had used some of them in this delicious Oatmeal Breakfast Bread. That was my first experience baking with fresh figs.
I jumped at the chance to receive more figs and was excited when they arrived in the mail last week.
I had spotted a recipe for Fresh Fig Ice Cream in David Lebovitz's The Perfect Scoop and that was the first thing on my list to make with my figs.
It couldn't have been easier to make either. I just cut up some figs, put them in a saucepan with a little water, let them get tender, added a little sugar, then let the mixture become soft and jam-like. Then you let the fig mixture cool a little bit, put it in the food processor with a little cream and lemon juice, puree and the only thing left to do is let it cool and churn it in your ice cream maker.
Because figs have such a beautiful color and flavor, this ice cream is unbelievably delicious. I think it is my new favorite.
We have been eating them fresh, adding them to salads, pairing them with a little cheese and enjoying them quite a bit. I even received some dried figs, which I can't wait to use. I have been given the chance to giveaway a case of fresh figs!
If you are interested just leave a comment on this post, making sure to leave a way for me to contact you. This giveaway will close on Saturday, August 28th at 12 am, midnight.
Here are some interesting "Fig Facts".
Did you know?
· There are five varieties of California figs; each with distinct flavor profiles.
· The fig tree is the symbol of abundance, fertility, and sweetness.
· Figs provide more fiber than any other common fruit or vegetable.
· Although considered a fruit, the fig is actually a flower that is inverted into itself.
· Figs contain natural humectants – properties that extend freshness and moistness in baked products.
· Figs are fat-, sodium- and cholesterol-free.
· California fig growers produce 100 percent of the nation’s dried figs and 98 percent of the country’s fresh figs.
To learn more about California fresh and dried figs, visit www.calfreshfigs.com or www.californiafigs.com.
 Fresh Fig Ice Cream
From David Lebovitz's The Perfect Scoop
2 lbs fresh figs (about 20)
1/2 cup of water
1 lemon, preferably unsprayed
3/4 cup of sugar
1 cup of heavy cream
1/2 teaspoon of freshly squeezed, lemon juice, or more to taste (I added the juice of 1/2 lemon)
Remove the hard stem ends from the figs, then cut each fig into 8 pieces. Put the figs in a medium, nonreactive suacepan with the water, and zest the lemon directly into the saucepan. Cover and cook over medium heat, stirring occasionally, for about 8-1o minutes until the figs are tender.
Remove the lid, add the sugar and continue to cook until it reaches a jam-like consistency. Remove from the heat and let cool to room temperature. Blend together with cream and lemon juice, chill in the fridge and then put in your ice cream maker per the manufacturer's instructions.
Sunday, July 18, 2010
Key Lime Pie Gelato
 When I was visiting my sister in DC, she was really excited about her new Ice Cream Maker that she gifted to her husband for Father's Day. She wanted me to show her how to make custard, so that she could make gelato. She also purchased a great book and picked this Key Lime Pie Gelato, as the first gelato to try.
Making the gelato base was the same as making an ice cream custard- the only difference being that there is more whole milk and less cream in this gelato base than a typical ice cream custard.
A slight difference, in my opinion.
We added more graham cracker crumbs then the recipe called for and made sure to freeze them ahead of time, so they would be completely frozen.
This was a really great frozen treat. It really tasted like key lime and everyone loved it.
recipe from the Ciao Bella Book of Gelato & Sorbetto
Plain Base
Makes enough for about 1 quart of gelato
INGREDIENTS
2 cups whole milk
1 cup heavy cream
4 large egg yolks
2/3 cup sugar
PREPARATION
In a heavy-bottom saucepan, combine the milk and cream. Place over medium-low heat and cook, stirring occasionally so a skin doesn't form, until tiny bubbles start to form around the edges and the mixture reaches a temperature of 170 degrees F.
Meanwhile, in a medium heat-proof bowl, whisk the egg yolks until smooth. Gradually whisk in the sugar until it is well incorporated and the mixture is thick and pale yellow. Temper the egg yolks by very slowly pouring in the hot milk mixture while whisking continuously. Return the custard to the saucepan and place over low heat. Cook, stirring frequently with a wooden spoon, until the custard is thick enough to coat the back of the spoon and it reaches a temperature of 185 degrees F. Do not bring to a boil.
Pour the mixture through a fine-mesh strainer into a clean bowl and let cool to room temperature, stirring every 5 minutes or so. To cool the custard quickly, make an ice bath by filling a large bowl with ice and water and placing the bowl with the custard in it; stir the custard until cooled. Once completely cooled, cover and refrigerate until very cold, at least 4 hours or overnight.
When the custard has been completely chilled,
add:
3 Tbls key lime juice
2 tsp lime zest
Now churn in your ice cream machine, according to directions.
When custard is almost ready, add
3/4 cup crushed graham crackers, frozen.
Transfer to a container and freeze, until firm enough to scoop.
Friday, December 18, 2009
Pumpkin Spice Scones
 Every time I open a can of pumpkin, I know exactly what I am going to do with it. Well, at least part of it. The fun thing is figuring out what to do with the sometimes 1/3 cup or so, of pumpkin puree that I have leftover.
I don't even remember how I happened upon this recipe for Pumpkin Spice Scones,
from Pinch my Salt. But I read that the recipe had been triple tested until it was just right and I loved the spices that were included in these scones. Also the two different icings, cinnamon and ginger-molasses had me intrigued. These scones were absolutely amazing. I don't know if it was the fact that these had cake flour in them, but they were so soft and delicious. I can't even explain the texture, it was unbelievable. Cathy and I were tweeting about these and we completely agreed, so its not just me that raved about these.
The spices were absolutely perfect too.
I left out the raisins, just because I felt like it. I love raisins, but I really didn't want them in these for some reason.
I can't wait to make these again over the Christmas break. Perfect for breakfast, brunch or a snack.
I will use any excuse to make these again.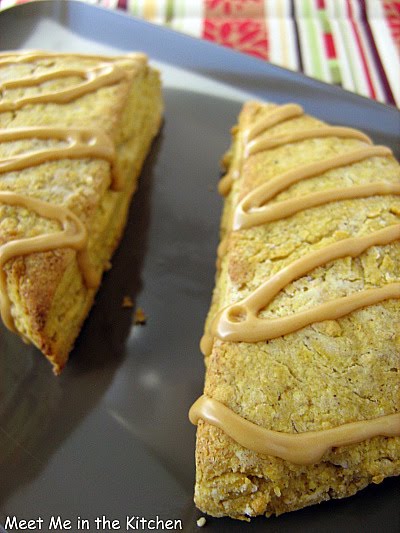
I made a little bit of a change on the icing-- I poured a little bit of molasses in a bowl- added some ground ginger and about 1 cup of powdered sugar. added skim milk until I could get it to come together. More ginger and molasses, until it had that spicy bite.
Recipe for Pumpkin Spice Scones
Friday, November 20, 2009
2 Thanksgiving Stuffings/Dressings- Butternut Squash & Cheese Panade and Savory Butternut Squash Dressing
 When I was narrowing down all the recipes I wanted to try out before Thanksgiving, I saw these two different takes on stuffing/dressing that both contain butternut squash. I love butternut squash. I think it has the perfect texture and flavor and could turn a squash-hater into a squash lover.
The first recipe is called Butternut Squash and Cheese Panade. (What is panade? Check out this link or this one for more info) I used a multigrain sourdough bread to make my bread crumbs and made enough for the other recipe that I was going to make later. I also roasted a lot of butternut squash and onions with the herbs, so I would have enough for the other stuffing.
This panade is super simple. You layer your bread cubes, butternut squash/onion/herb mixture and cheese. (I used swiss.) Then you pour in the chicken broth, which is soaked up by the bread and bake it until it is golden and the bread is puffed.
I thought this was really good. Very tasty combination of flavors. The second stuffing/dressing was Savory Butternut Squash Dressing. I found this recipe in Better Homes and Gardens Magazine.
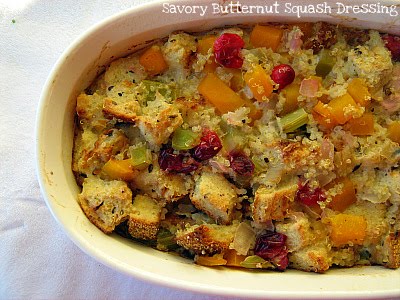 I changed a lot of things about this recipe, mainly because I already had my butternut squash roasted. I also had cooked quinoa in my fridge so I decided to use that instead of the wild rice called for. I also left out the dried cranberries.
 I sauteed my onion, celery and fresh cranberries in a little bit of oil and then mixed up the egg mixture. I threw in some cooked quinoa and my toasted bread cubes and then put it in the oven to bake. I liked this recipe better, but I think it is because it had more of the traditional "stuffing" texture that I am used to. I really didn't follow the recipe that closely though. I kind of did my own thing.
I really like how both of these recipes incorporate butternut squash into the stuffings/dressings. I am all about having more nutrition and vegetables at Thanksgiving, so however I can get them in, I will try it. Do you have a favorite stuffing/dressing?
Recipe for Savory Butternut Squash Dressing
Recipe for Butternut Squash and Cheese Panade
Friday, November 6, 2009
Malted Whole Wheat Chocolate Chip Cookies and Malted Milk Ice Cream
 The moment I saw these cookies over at Cafe Johnsonia (Hurry and go over there and look at Lindsey's blog, she is taking it down at the end of this week), I knew I would make them when my mom was here to visit. She loves malt.
 I have only made a couple of dessert with malt-Peabody's Chocolate Malted Cupcakes with Malted Whipped Frosting (fabulous!) and Dorie's Chocolate Malted Whopper Drops, but both of those desserts were made when I lived in Utah and my mom was close by to taste the goods.
Lindsey said these kind of tasted like a graham cracker. They only use whole wheat flour and are quite simple to mix together. The dough chills overnight and then you scoop the cookies and bake them the next day.
Superb- my mom loved them! I thought since I was making cookies with malt, I might as well make some malt flavored ice cream as well. Nancy was kind enough to share a recipe that she had reduced to make a smaller amount, but I ended up using David Lebovitz's recipe from his book, The Perfect Scoop. I made a 1/2 batch of the ice cream and omitted the whoppers.
The first night my mom was here, we served her this delicious combination of malt desserts. She was in heaven! My daughter crumbled her cookie and mixed it into her ice cream, and soon the rest of the family followed suit.
These cookies freeze well and also are a good cookie to send in packages.
I have a certain friend in mind, who loves malt as much as my mom. You know who you are- I will add these to your Christmas package!
Malted Whole Wheat Chocolate Chip Cookies
an original recipe by Lindsey Johnson
2 1/2-3 cups whole wheat flour (add a bit more if you like a thicker cookie)
½ tsp. salt
1 tsp. baking soda
1 cup (2 sticks) butter
2 cups firmly packed dark brown sugar
3/4 cup malt powder (such as Carnation or Horlicks, not Ovaltine)
2 large eggs
2 tsp. pure vanilla extract
1 package good quality milk chocolate chips (we like Ghirardelli or Guittard)
1. In a large bowl, whisk together flour, baking soda, and salt; set aside.
2. Melt butter in another large mixing bowl (microwave safe) and whisk in sugar. Let cool to room temperature. Add the eggs, malt powder and vanilla; whisk well and make sure no lumps of dark brown sugar remain.
3. Fold the dry ingredients into the butter/sugar mixture until just combined. Fold in chocolate chips. Cover with plastic wrap and refrigerate until firm—about 30 minutes or overnight. (I liked them best when chilled overnight.)
4. Preheat oven to 325 degrees. Using two large spoons, or (my favorite way) a small ice cream scoop, place golf-ball size mounds of dough on a baking sheet—about 3” apart. (A large, rimmed baking sheet will fit about 9 balls of dough.) Gently press the cookies down if you used 3 cups of flour so they spread evenly. Bake until cookies no longer look wet on top, about 10-12 minutes, making sure to rotate baking sheet halfway through baking time. Remove from oven and cool on the pan for 5 minutes. Place cookies on a wire rack to finish cooling.
David Lebovitz's Malted Milk Ice Cream
Recipe by David Lebovitz
Ingredients
1 cup half-and-half
3/4 cup sugar
Pinch of salt
2 cups heavy cream
1/4 teaspoon vanilla extract
2/3 cup malt powder
6 large egg yolks
2 cups malted milk balls, coarsely chopped
Warm the half-and-half, sugar, and salt in a medium saucepan. In a large bowl, whisk together the heavy cream, vanilla, and malt powder and set a mesh strainer on top.
In a separate medium bowl, whisk together the egg yolks. Slowly pour the warm mixture into the egg yolks, whisking constantly, then scrape the warmed egg yolks back into the saucepan.
Stir the mixture constantly over medium heat with a heatproof spatula, scraping the bottom as you stir, until the mixture thickens and coats the spatula. Pour the custard through the strainer and whisk it into the malted milk mixture. Stir until cool over an ice bath.
Chill the mixture thoroughly in the refrigerator, then freeze it in your ice cream maker according to the manufacturer's instructions. As you remove the ice cream from the machine, fold in the chopped malted milk balls.
.
Saturday, October 31, 2009
Easy Pumpkin Ice Cream
 Happy Halloween!
I love pumpkin anything. One of my favorite things is pumpkin ice cream.
I saw a really easy, non-custard recipe for pumpkin ice cream on Simply Recipes and decided I wanted to make it.
I bookmarked the recipe and when I was ready to make it, I went back to the link and it was gone!
I remembered the recipe in my mind and decided to make it anyway.
It was really easy- just 4 ingredients, that you mix up, chill and churn.
I remember the recipe said it was best served the day it was churned.
I let it set up in the freezer for a couple of hours and then let my kids try it. They really liked it-we sprinkled some chocolate chips on top.
I tried a bite and thought it was a little bit too creamy (Wierd, but that's what I thought).
I think it would taste better as a layer to a chilled pie maybe, with a gingersnap crust.
We enjoyed it and it was fun to make! Easy Pumpkin Ice Cream as remembered from Simply Recipes
1-15 oz can pure pumpkin puree, not pumpkin pie filling, about 1 3/4 cups
1 1/2 cups heavy whipping cream
3/4 cup brown sugar
2 Tbls pumpkin pie spice
Combine all ingredients in food processor until smooth. Chill mixture until cold and transfer to ice cream maker. Churn according to ice cream maker directions. Freeze for a few hours until firm.
This ice cream is best enjoyed the day it is made.
Monday, September 28, 2009
Quick Cinnamon Biscuits
 My kids are always asking me to make cinnamon rolls for breakfast. I like making warm, delicious breakfasts, but I think I would have to get up at 4 am to have warm cinnamon rolls ready on a school day. A few years ago, I might have sacrificed my sleep and gotten up that early, but the older I get, the more sleep I need or the less willing I am to sacrifice my sleep for baking. Go figure!
We barely wake up in time to make it to school, so I was trying to find a quick alternative to traditional cinnamon rolls.
I was asking people on Twitter if they had any fast cinnamon roll recipes and Sarah, who has a wonderful blog- Blue Ridge Baker, told me about these Quick Cinnamon Biscuits that she found on Rebecca's blog- Ezra Pound Cake. Check out Sarah's post about these too- she topped them with a maple caramel sauce. Yummy!
I looked over the recipe and had everything I needed to try them out.
I made them on a Sunday morning and sure enough- they were ready in a flash!
You mix the dough together in a bowl and it is ready in, maybe 2 minutes or something? They are super easy to fill and roll, too.
Perfect.
The filling has nutmeg and cinnamon mixed with the brown sugar which I think really adds a little something special to these.
The recipe says that it yields 9 biscuits/rolls, but I got 12.
They do not taste exactly like a cinnamon roll that is made with yeast dough, hence the word biscuit in the recipe name, but they made my children very happy. If you do make these, know that they will have the texture and taste of a sweet biscuit.
My son ate the 2 that were leftover, the next morning on the way to school and he decided he liked them better cold. (I stored them in the fridge over night.)
I could totally get these ready on a school morning. There is hope for me.
You should try these- they are easy and delicious!
Recipe for Quick Cinnamon Biscuits
One Year Ago-Beef Stroganoff
Sunday, September 20, 2009
The Cake Slice- Triple Chocolate Fudge Cake
 I am lucky to have great friends. I have multiple best friends and I feel really blessed.
One of these friends is Jaime. She lives here in Georgia and we have been friends since our oldest children were just babies.
That is actually how we became friends. We both had babies that were a couple months old and we were both stay-at-home moms, so we started walking everyday with our little ones. We just really connected and have been good buddies ever since.
Over the years we have stayed in touch, even though for some of those years we lived miles apart, and we were both really excited that I was going to move back across the country. We now live about 40 minutes from each other and each have 3 children that are the exact same ages. Our kids love each other, so it is really fun to get together. Anyway, the reason I am telling you all this, is because Jaime wanted me to make her a birthday cake. Her b-day was back in April, so I missed it, but I knew when the right cake came around, I would make it for her and call it her birthday cake.
Jaime also really, really loves her chocolate.
When I saw this months selection for The Cake Slice- Triple Chocolate Fudge Cake, I immediately knew this was Jaime's cake. The cake uses mayonnaise as the secret to its moistness and if ya'll know me, you know I do not in any way, shape, or form like mayo. I have never bought real mayo. I occasionally, sparingly use fat-free mayo (which was not allowed in this recipe), but the key words there are occasionally and sparingly.
So, when I was out buying the ingredients for the cake, I actually bought a very small jar of authentic mayo.
The cake is spiced with a little bit of cinnamon and also uses some hot coffee for flavor. I left the coffee out and just used hot water, because I figured the hot liquid is what it really needed, not so much the mocha flavor- I don't do mocha.
The moist chocolate cake layers are filled with white chocolate mousse and then a rich, satiny sour cream chocolate frosting is spread on top.
I assembled the cake, let it sit in the fridge for awhile, and then we set out on our trek to Jaime's house.
I will be honest. I was really scared. I was scared that the cake wouldn't make it through the 40 minute drive on a Sunday afternoon. It wasn't too hot outside, really, but I was petrified none the less.
Good thing I had let the cake sit in the fridge for awhile, because 5 minutes before we got to Jaime's house, the top layers slid just a tad and the white chocolate mousse broke through the frosting.
We made it to her house with the cake in one piece and she LOVED it! Chocolate lovers- you will love this cake.
I thought it was ok- but it was a bit of chocolate overload for me. The frosting wasn't very sweet at all, and a few people weren't too excited about that fact, but still it was gobbled down with the help of some vanilla ice cream.
I left the cake at her house and she was able to enjoy the leftovers. If you want to see other variations of this 3 layer beauty check out The Cake Slice Bakers!
Happy Birthday Jaime-5 months later! This is the last cake that we will be baking from Sky High: Irresistible Layer Cakes, the book we have used for the last year for The Cake Slice. Next month we will start baking out of Southern Cakes by Nancie McDermott.
Triple Chocolate Fudge Cake
(Recipe from Sky High Irresistible Layer Cakes by Alisa Huntsman and Peter Wynne)
2 ¼ cups all purpose flour
1 cup unsweetened cocoa powder
2 ¼ tsp baking soda
1 ¼ tsp baking powder
1 tsp salt
½ tsp ground cinnamon
2 ½ ounces unsweetened chocolate, chopped
1 cup milk
1 ¼ cups hot, strongly brewed coffee (I just used hot water)
2 eggs
1 cup mayonnaise (not low fat or fat free)
1 ½ tsp vanilla extract
2 ¼ cups sugar
White chocolate mousse (below)
Sour cream chocolate icing (below)
Preheat the oven to 350 degrees F. Butter the bottoms and sides of three 9 inch round cake pans. Line the base of each pan with parchment.
Sift together the flour, cocoa powder, baking soda, baking powder, cinnamon and salt. Set aside.
Put the chocolate in a large heatproof bowl. Bring the milk to a simmer. Pour the hot coffee and milk over the chocolate. Let stand for a minute, then whisk until smooth. Let the mocha liquid cool slightly.
In a mixer bowl, beat together the eggs, mayonnaise and vanilla until well blended. Gradually beat in the sugar. Add the dry ingredients and mocha liquid alternately in 2 or 3 additions, beating until smooth and well blended. Divide the batter among the 3 prepared pans.
Bake for 25 to 28 minutes, or until a cake tester inserted in the centre comes out almost clean. Let the cakes cool in their pans for 10-15 minutes before un-molding onto a wire rack and carefully peeling off the paper. Leave to cool completely.
White Chocolate Mousse
4 ounces white chocolate, chopped
1 cup heavy cream
1 egg white
1 tbsp sugar
Melt the white chocolate with ¼ cup cream in a double boiler. Whisk until smooth. Remove from the heat and let the white chocolate cream cool to room temperature.
When it has cooled, beat the remaining ¾ cup cream until soft peaks form. In a clean bowl whip the egg white with the sugar until fairly stiff peaks form.
Fold the beaten egg white into the white chocolate cream, then fold in the whipped cream until blended. Be sure not to over mix.
Sour Cream Chocolate Icing
12 ounces bittersweet or semi sweet chocolate, chopped
1 stick (4 ounces) unsalted butter
2 tbsp light corn syrup
¼ cup half-and-half at room temperature
½ cup sour cream, at room temperature
Melt the chocolate with the butter and corn syrup in a double boiler over barly simmering water. Remove from the heat and whisk until smooth.
Whisk in the half-and-half and sour cream. Use while still soft.
To Assemble
Place one layer, flat side up, on a cake stand or serving plate. Cover the top evenly with half the white chocolate mousse, leaving a ¼ inch margin around the edge. Repeat with the second layer and the remaining mousse. Set the third layer on top and pour half the sour cream chocolate icing over the filled cake. Spread all over the sides and top. Don’t worry if some of the cake shows through. This first frosting is to seal in the crumbs, and is known as a crumb coat. Refrigerate the cake for 30 minutes.
After this time cover the cake with the rest of the icing, smoothing it down the sides. It should be the consistency of mayonnaise. Use a palette knife or the back of a spoon to swirl the frosting around the cake.
One Year Ago-Cherry-Pistachio Wedding Cookies
Tuesday, June 16, 2009
TWD- Honey-Peach Ice Cream
 This weeks recipe, Honey Peach Ice Cream, was chosen by Tommi over at brown interior. You can get the recipe by visiting her blog.
I didn't know if I would have time to make the recipes for June, since we were about to move across the country, but I made time for them.
My friend wanted me to make her ice cream before I moved, so this was the perfect opportunity. Except for the fact that peaches aren't ripe in Utah until about August.
My parents have a peach tree in their backyard and boy, did it produce gorgeous, delicious, beautiful, juicy, huge peaches by the bushel last summer. We had so many we didn't know what to do.
I made peach pie, Dorie's Dimply Cake with peaches, peach ice cream, smoothies, chiffon cake with peaches as the filling- I mean, you get the idea.
We had so, so many and so, we froze a bunch of them too.
I used those delicious frozen peaches for this ice cream.
I followed Dorie's instructions and pureed half the peach-honey mixture and left the other peach mixture in chunks. Having the peach chunks in there, didn't really bother any of us.
The only thing that most of my tasters noted was that this ice cream tasted much better after it had ripened in the freezer for 24 hours.
I made it in the morning and it had time to sit in the freezer for a couple of hours, but it tasted much better the next day.
Go see what the other TwDer's thought about this fabulous frozen treat by checking out the TWD Blogroll!

Coming Tomorrow- Overnight French Toast Mini Cups


