Roasted Cauliflower (I used olive oil cooking spray and 1/2 Tablespoon olive oil) on the side
Monday, May 7, 2012
What I Ate Yesterday (Thursday April 19th)
Roasted Cauliflower (I used olive oil cooking spray and 1/2 Tablespoon olive oil) on the side
Posted by Mary Ann at 8:21 AM 0 comments
Labels: cheese, eggs, oatmeal, swiss chard
Wednesday, October 19, 2011
Butternut Squash and Hazelnut Lasagne
A couple of weeks ago, a friend asked me if I wanted to get together and make this lasagne with her. I thought that cooking together sounded like a blast, so I quickly agreed to come over later that week with all my supplies to put this lasagne together. I usually avoid recipes that have tons of cheese and milk, since we have some lactose intolerance issues with certain members of my family, but not this time. My friend had tried this recipe before and loved it. She said that lots of the comments on epicurious said it took forever to put together, but we didn't think it was so bad. I prepped my squash, herbs, nuts, cheese, etc., before I went to her house, so we just cooked the squash, made the sauce and then assembled the lasagne.
It was so nice to have this made and waiting in the fridge, so that when dinner time rolled around, all I had to do was put it in the oven. This made a ton of lasagne! I know the recipe said that it serves 6, but in order for that to happen, someone would have to eat a ton of this. We did even eat half of it that night. The butternut squash, sage and hazelnuts go perfectly with the cheese and sauce. All we had on the side was a huge salad of mixed baby greens and it was a filling meal. I ended up freezing the leftovers, so we could enjoy them later.
Here is the recipe for Butternut Squash and Hazelnut Lasagne
Posted by Mary Ann at 10:35 AM 1 comments
Labels: butternut squash, cheese, hazelnuts, lasagna, milk, sage
Wednesday, September 28, 2011
Creamy Cauliflower Mac
Macaroni and cheese doesn't ever happen at our house. Mostly because my son doesn't like cheese and it's kind of hard to hide the cheese in mac n' cheese. Plus, I don't think I ever ate it growing up, so it really isn't something that I think about very often.
I came across this recipe and remembered seeing things like this before, where cauliflower puree is used in the sauce and replaces almost all of the milk/cream/cheese, or whatever people usually use in their mac n' cheese. I had 2 heads of cauliflower in my fridge and decided I would try this one out. I used whole wheat shells for the pasta because I couldn't find whole wheat elbows. You cook the cauliflower in boiling water and then the pasta. The cauliflower is pureed with a little bit of cheese and some other ingredients that add flavor, like dijon mustard. I added more cheese than called for because I tasted the sauce and it was a little bland, so I added more cheese and tasted it again.
My family liked this recipe. My daughter whose favorite food is cheese, absolutely loved it. I thought it was really good and a nice way to use cauliflower.
Here is the recipe for Creamy Cauliflower Mac from Mark Bittman
* I used whole wheat pasta
* I added about 1/3 cup more cheese than called for because I pureed the sauce and tasted it and decided I wanted it to have a little bit more cheese flavor
* I would add less Dijon mustard next time
Posted by Mary Ann at 8:47 AM 4 comments
Labels: cauliflower, cheese, pasta
Friday, September 2, 2011
Mini Cheeseburger Salad with Yellow Mustard Vinaigrette
I first made this salad a few years ago and it was an absolute hit. I made it for my family, made it for potluck dinners, made it for company, and shared the recipe with friends. It takes everything that is delicious about a cheeseburger and makes it even more delicious.
You make little burgers, along with a delicious mustard vinaigrette and they are layered on a bed of romaine, cherry tomatoes (I still have some growing in my garden!), and sliced dill pickles. My whole family loves this one, even me.
Here is the recipe for Mini Cheeseburger Salad with Yellow Mustard Vinaigrette
* I used mild cheddar to top my mini cheeseburgers
* I used ground sirloin for the burgers
Posted by Mary Ann at 8:32 AM 2 comments
Labels: burgers, cheddar, cheese, cherry tomatoes, family favorite, mustard, pickles, salad
Monday, August 8, 2011
Cooking School- Whole Wheat Goldfish Crackers
I've mentioned before that I don't really buy any sort of premade snacks. Since I like to spend time in the kitchen, I figure it must be possible to make anything that is out there for snacking, at home.
My daughter asked me if we could make goldfish crackers and I knew that they had been made successfully by smitten kitchen, so I said of course!
These crackers really couldn't be easier. All you have to do is shred some cheese (which my kids love to do and I remember it being one of my favorite jobs when I was their age), put it in the food processor with a couple other ingredients, pulse until a dough forms, roll it out, cut out shapes or make it into squares and bake them up. I was really quite surprised at how easy this turned out to be. So easy in fact, that we made extra dough and have it in the freezer for the next time a craving hits.
And, you don't have to actually make these cheese crackers into goldfish shape. We ended up slicing some of the dough with a pizza cutter and just making them into squares as well. (although the goldfish are pretty cute!) Here's my helper giving our goldfish their "eye" and smile
Here is the recipe for Whole Wheat Goldfish Crackers from smitten kitchen
* I used all white wheat flour in my goldfish
* if you are interested in buying a goldfish cookie cutter, the link is included with the recipe
Thursday, July 21, 2011
Cooking School- 7 Layer Dip
This is the perfect thing to make with children in the kitchen. It is fun for the kids to help open cans, chop things, spread the layers and sprinkle everything on top.
My girls and I decided to make this dip for a family dinner with a Mexican theme. Mostly because I can remember making it as a child with my family when we would get together with my cousins. I remember everyone taking part in preparing the different layers and then putting it together.
I haven't made this dip since I've been married, although I have tried other versions, like this Meditteranean one and a lighter one for a cooking group I was in. My advice is to taste test the different layers as you go along to make sure they have the right flavor and let someone help you put it together. We had a lot of fun.
If you are lucky enough to have any leftovers, try them with scrambled eggs, in some sort of burrito or as part of a salad.There are so many version of 7 Layer Dip out there, but this our adapted version of the one I remember making with my family as a child
7 Layer Dip
1 can bean dip or refried beans (seasoned with garlic powder to taste)
8 oz container sour cream (I used greek yogurt since I had it on hand)
1 pkg taco seasoning
3 ripe avocados
1 lemon
shredded lettuce
shredded cheese (We used a monterey jack/cheddar blend & the girls shredded it)
chopped tomato
sliced black olives (I accidentally bought chopped black olives this time)
1. On a large platter or in a deep dish, spread the bean dip/refried beans in a even layer.
2. Combine the taco seasoning and sour cream in a bowl; spread on top of bean layer.
3. Mash the avocados with a few Tbls of freshly squeezed lemon juice; season with salt and pepper. Spread the avocados over the taco sour cream mixture.
4. Sprinkle shredded lettuce on top of avocado, followed by the shredded cheese, chopped tomatoes, and sliced black olives.
5. Chill until ready to serve.
6. Serve with tortilla chips.
Posted by Mary Ann at 7:59 AM 4 comments
Labels: avocado, black olives, cheese, dip, lettuce, refried beans, tomatoes
Friday, October 1, 2010
French Fridays with Dorie- Gougeres
Today is the start of a brand new cooking group- French Fridays with Dorie. The wonderfully talented Dorie Greenspan has come out with a new cookbook, Around My French Table and Laurie, the founder of Tuesdays with Dorie, along with the help of a few other talented people, has put together a group that will be cooking our way through this gorgeous cookbook.
I feel like Dorie's recipes
have taught me so much about baking and given me the opportunity to bake things I never would have thought to make and I have TWD to thank for that. Dorie's recipes are always fantastic and delicious.
At first I was unsure as to whether I wanted to join in, simply because I like cooking and choosing for myself what I am going to make for dinner.
But, when I looked through this cookbook, I realized that joining this group and cooking through these recipes would push me to try new and fun things. I haven't ever really cooked french food, so I thought it would be an adventure. I absolutely love trying new recipes.
Plus, there are lots of things that I love in this cookbook, like lentils, beets, fish, green veggies, eggs, and of course desserts, so I decided to go for it.
Dorie chose this month's recipes and started us off with Gougeres-cheese puffs, that are made with pate a choux dough, the same dough you use to make sweet cream puffs, eclairs, or profiteroles. Dorie says that these are made everywhere in France and calls them one of France's "national treasures".
The dough comes together quickly and if you follow the recipe directions, these are a really easy thing to make. They puffed up beautifully.
My only regret is that I didn't buy the more expensive Gruyere cheese to use in these Gougeres. I used sharp cheddar because it was much more affordable, but the cheese flavor wasn't as pronounced as it should have been in these lovely cheese puffs.
The recipe makes a lot of gougeres, and Dorie said they bake up well if you freeze the little mounds of dough and bake them straight from the freezer.
I only baked up 5 of these, so that we could taste them and froze the rest for later- they would be a great appetizer at a party, filled with some sort of savory deliciousness.
If you want to see who else joined in on these tasty little cheese puffs, check out French Fridays with Dorie!
Dorie has posted this recipe HERE or you can find a pdf copy of October's recipe HERE!
Posted by Mary Ann at 5:57 AM 10 comments
Labels: butter, cheese, Dorie Greenspan, eggs, flour, french fridays with Dorie, milk
Wednesday, June 30, 2010
Barley and Black Bean Salad
I found this recipe when I was searching for a nice side dish or salad to take to a family reunion potluck lunch.
I loved that this salad used barley as the base.
It was quick to make and easy to transport. A great side dish.
I thought the barley went really well with the black beans, as well as the other flavors that were going on in the salad.
This salad tasted great chilled, but it would also be really good when served at room temperature.
Recipe for Barley and Black Bean Salad
Posted by Mary Ann at 8:04 AM 1 comments
Labels: barley, black beans, cheese, cilantro, lemon juice, salad, tomatoes
Friday, June 18, 2010
Chard Quiche
I was looking for another way to use swiss chard a couple weeks ago and somehow found this recipe for Chard Quiche.
The thing that interested me the most, was the fact that the crust is made of wheat germ, flour, and sauteed chard. That's it. No butter, no shortening, etc.
This made me happy because my least favorite part of traditional quiches, is the pie-type crust. That is why we usually opt for frittatas for dinner when eggs are making an appearance.
I also had exactly 1 cup of whole milk in my fridge leftover from some dessert that needed to be used.
I might have used more chard than the recipe called for. I didn't weigh it or measure it. I figure it is okay to err on the side of more vegetables.
I also just used whatever cheese I had in the fridge. Happened to be mozzarella.
This was a really good quiche. I really loved the hearty/healthier crust.
The leftovers were good too.
This would be a great one to serve at brunch or dinner.
Recipe for Chard Quiche
* I used a little less oil than called for to cook the chard
* I used mozzarella cheese
Posted by Mary Ann at 6:26 AM 2 comments
Labels: cheese, eggs, quiche, swiss chard, wheat germ
Saturday, February 27, 2010
Frittata with Spinach, Sausage, Peppers, and Eggplant
It would be a complete understatement if I said my kids didn't like helping me in the kitchen.
It has gotten to the point where I hardly get to do anything and they start fighting over who gets to stir or add this ingredient or whatever.
I love having them help and love the fact that they are so interested in cooking/baking.
On a Friday night, a couple of weeks ago, my 5 year old daughter told me she wanted to make dinner. I got out some veggies and we started discussing the options.
This frittata is what we ended up with.
I kid you not when I say that my 5 year old made this dinner almost without any help.
She chopped (with me holding the knife with her) sauteed (I watched), whisked the eggs, measured, layered, etc.
She really did all the work and she was so proud and excited to eat what she had made.
The great thing about this meal is that you will end up with roasted veggies and cooked sausage/onion mixture, which will give you a head start on dinner for a couple of extra nights.
Another thing about this frittata is that you can mix and match the veggies and protein to whatever you have on hand at the time.
You could roast mushrooms or zucchini or whatever you have on hand. You could use chicken, ground turkey/beef, tofu, or any other protein in place of the turkey sausage.
You could use thyme or rosemary instead of the chives. You could also add cottage cheese or feta to the egg mixture. Be adventurous and mix it up!
We have started having a frittata once a week using whatever veggies are in the fridge.
I love having the leftover pieces for breakfast later in the week.
The best part about having kids help in the kitchen is that they really want to eat what they create. I did not have to bribe or plead with my kids to eat this. My daughter was so happy that she made it, she gobbled it up and her siblings were so proud they gobbled too.
Not to mention, it was really delicious.
Frittata with Spinach, Sausage, Peppers, and Eggplant by Mary Ann and R (age 5)
1 red bell pepper, chopped
1 yellow bell pepper, chopped
1 small eggplant, chopped
2 Tbls olive oil, divided
1 large onion, chopped
2 garlic cloves, minced
1 pkg Lean Sweet Italian Turkey Sausage, (I used Jennie-O)
1 6 oz bag baby spinach
10 eggs
2 Tbls chopped fresh chives
1/4 cup skim milk
1/2 cup shredded mozzarella cheese
Preheat oven to 450 degrees F.
Place chopped peppers and eggplant on a baking sheet. Drizzle with 1 Tbls olive oil. Season with salt and pepper. Roast for 15 minutes. Set aside. Reduce oven temperature to 400 degrees.
Heat 1 Tbls olive oil in a large skillet. Add chopped onion and saute for a few minutes. Add sausage and break up into small pieces. Add garlic and cook until sausage is cooked through, 6-9 minutes. Place half of sausage/onion mixture in another container and refrigerate for another use.
Add baby spinach to sausage/onion mixture left in skillet, and saute, until wilted. Set aside.
In a large bowl, crack 10 eggs. Whisk to combine. Add chopped chives and milk. Season with salt and pepper, and whisk until combined.
Spray a 9x13-inch pyrex dish with cooking spray. Spread the sausage/spinach mixture on the bottom of the dish. Add half of the roasted peppers and eggplant (put the other 1/2 of veggies in a plastic container and refrigerate for another day).
Pour the egg mixture over the sausage/veggies and make sure all veggies are covered with the eggs. Sprinkle the shredded mozzarella cheese over the top.
Bake in the 400 degree oven for 20-23 minutes.
Serve.
Posted by Mary Ann at 5:35 PM 7 comments
Labels: cheese, chives, eggplant, eggs, red bell peppers, sausage, spinach, yellow bell pepper
Thursday, January 21, 2010
CEiMB- Five Layer Mexican Dip
This week's CEiMB recipe is Five Layer Mexican Dip. It was chosen by Heather who blogs over at Mama Cooks. You can find the recipe on her blog or by clicking on the link at the bottom of this page.
The Five Layers in this dip are: 1- a delicious black bean dip, made in the food processor with garlic, cumin, and other things 2- corn/cilantro mixture combined w/ some of the leftover onion/garlic from layer 1, 3-mashed avocado with lime juice, 4-chopped tomato, jalepeno, and scallions, 5- shredded cheese.
I went back and forth about making this recipe, mainly because I have 2 tomato haters and 1 avocado hater in my family and didn't know how it would go over.
I decided to make it for a family dinner that we were going to because then there would be more mouths to fill and hopefully more people that would like this dip. I didn't love it. Sorry. I am not going to lie to you. I wanted to really like it, but it was just ok.
I liked the black bean layer and I would have rather eaten that with the chips.
The corn/cilantro layer just didn't fit. I don't love frozen corn-not a big fan. Don't get me wrong, I love fresh corn on the cob, but not so much the frozen kernels.
I just didn't appreciate all the layers together.
That's not to say that there weren't those family members who loved the dip. There were some. They liked it so much that they were gifted the leftovers :)
Go check out the CEiMB Blogroll to see what everyone else thought about this one!
Recipe for Five Layer Mexican Dip
Posted by Mary Ann at 7:00 AM 10 comments
Labels: avocado, black beans, cheese, corn, Craving Ellie in my Belly, cumin, dip, green onions, snack, tomatoes
Thursday, December 10, 2009
CEiMB- Twice Baked Potatoes with Sharp Cheddar and Oven Roasted Broccolini
This week's CEIMB recipe was Broccoli and Cheddar Stuffed Potato Skins with Avocado Cream. It was chosen by Anne who blogs over at Rainforest Recipes,
I did not make this recipe exactly. I did use some of the same ingredients and made something that my kids would eat.
Somehow I got inspired by the potatos, the cheese and then switched out the broccoli for broccolini. It just tastes so much better.
I baked my potatoes in the oven until I was able to scoop out the insides and then I just mashed the potatoes with 2 Tbls of unsalted butter, 1/3 cup fat free greek yogurt, 2 Tbls skim milk, salt and pepper.
I drizzled my broccolini with olive oil, then added some salt and pepper, and roasted it in a 400 degree oven until it was tender, about 15 minutes.
I put the mashed potato mixture back into the potato skins and then covered them with cheddar cheese. I popped them back in the oven, until the cheese was melted and the potatoes were warm throughout.
So, not exactly what the recipe said to do, but sometimes you have to improvise!
Check out the CEIMB Blogroll to see what everyone else did with this recipe!
Recipe for Broccoli and Cheddar-Stuffed Potato Skins with Avocado Cream
Posted by Mary Ann at 8:46 AM 6 comments
Labels: broccolini, cheddar, cheese, Craving Ellie in my Belly, greek yogurt, potatoes
Wednesday, December 2, 2009
Cubano Sandwiches
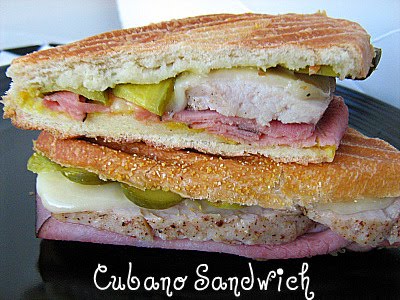
So what did I do with all the leftover Spice-rubbed Pork Loin? I know everyone out there has been dying to know. We could have just eaten it plain because it was so delicious, but in the November 2009 issue of Everyday Food, there was a recipe that called for the pork leftovers- Cubano Sandwiches.
I have never eaten a cubano sandwich or made one, but it looked like the type of meal my husband would love. Meat, more meat and cheese. Not to mention pickles and white bread.
I decided to give them a try, with a few healthy tweaks, of course. I completely omitted the butter from the recipe. Unless, I am baking or the butter actually plays an essential part in a recipe, I try to leave it out whenever possible.
I also reduced the amounts of meat, more meat and cheese that were on each sandwich. Usually when you see a picture of a cubano sandwich, the meat and cheese are piled high. I reduced it to just a slice or two of ham, one slice of cheese-cut in half, and two thin slices of pork.
Also, I was unable to find Portuguese rolls. I thought about making some, but decided to just use small hoagie rolls instead. I cut them in half, but not all the way through and then layered the sandwich fillings inside.
I also made these in my griddle/grill/panini press thing. Not sure what I mean? It is like this one, but a different brand. I basically just treated this sandwich like a panini and it was ready in minutes.
This was a hit with the entire family. Hubs loved it. Kids loved it. I even loved it. I would make the spice-rubbed pork again, just to make these sandwiches.
Cubano Sandwiches from Everyday Food November 2009
3 Tablespoons butter, room temperature (I omitted this)
4 Portuguese rolls, split (I used small hoagie rolls)
yellow mustard
1/2 pound thinly sliced deli ham (I used black forest ham)
1 pound Spice-rubbed Pork Loin, thinly sliced
1/2 pound Swiss cheese, thinly sliced
sliced dill pickles, to taste
1. Preheat oven to 425 degrees F. Butter inside of each roll (I skipped this step); spread with mustard. Divide ham, pork, and cheese among bottom halves of rolls. Top with pickles, more mustard to taste, and top halves of rolls.
2. Heat a grill pan and another heavy pan over medium. With a paper towel, lightly coat grill pan with butter. (I didn't do this) In batches, place sandwiches on grill pan and weight with second pan. Cook until bread is crisp on the outside, about 3 minutes per side; transfer grill pan to oven and bake sandwiches until cheese has melted, about 5 minutes. To serve, cut the sandwiches in half.
(I just used my 3-in-1: grill/griddle/panini press to make these. It is kind of like THIS Cusinart Griddler, but not that brand. I only had to put my sandwiches in my indoor grill/panini press and cook them until the cheese was melted. This eliminated some of the other steps)
Posted by Mary Ann at 7:12 AM 10 comments
Labels: bread, cheese, family favorite, ham, mustard, pickles, pork, quick and easy, sandwich
Friday, November 20, 2009
2 Thanksgiving Stuffings/Dressings- Butternut Squash & Cheese Panade and Savory Butternut Squash Dressing
When I was narrowing down all the recipes I wanted to try out before Thanksgiving, I saw these two different takes on stuffing/dressing that both contain butternut squash. I love butternut squash. I think it has the perfect texture and flavor and could turn a squash-hater into a squash lover.
The first recipe is called Butternut Squash and Cheese Panade. (What is panade? Check out this link or this one for more info) I used a multigrain sourdough bread to make my bread crumbs and made enough for the other recipe that I was going to make later. I also roasted a lot of butternut squash and onions with the herbs, so I would have enough for the other stuffing.
This panade is super simple. You layer your bread cubes, butternut squash/onion/herb mixture and cheese. (I used swiss.) Then you pour in the chicken broth, which is soaked up by the bread and bake it until it is golden and the bread is puffed.
I thought this was really good. Very tasty combination of flavors. The second stuffing/dressing was Savory Butternut Squash Dressing. I found this recipe in Better Homes and Gardens Magazine.
I changed a lot of things about this recipe, mainly because I already had my butternut squash roasted. I also had cooked quinoa in my fridge so I decided to use that instead of the wild rice called for. I also left out the dried cranberries.
I sauteed my onion, celery and fresh cranberries in a little bit of oil and then mixed up the egg mixture. I threw in some cooked quinoa and my toasted bread cubes and then put it in the oven to bake. I liked this recipe better, but I think it is because it had more of the traditional "stuffing" texture that I am used to. I really didn't follow the recipe that closely though. I kind of did my own thing.
I really like how both of these recipes incorporate butternut squash into the stuffings/dressings. I am all about having more nutrition and vegetables at Thanksgiving, so however I can get them in, I will try it. Do you have a favorite stuffing/dressing?
Recipe for Savory Butternut Squash Dressing
Recipe for Butternut Squash and Cheese Panade
Posted by Mary Ann at 9:50 AM 5 comments
Labels: bread, butternut squash, celery, cheese, chicken broth, cranberry, cream, herbs
Wednesday, October 28, 2009
Pasta with Roasted Red Pepper Sauce
I am taking my mom to the airport today. It has been a really fun week.
I am easily influenced by other peoples blogs, pictures, and suggestions when it comes to trying different recipes.
A couple weeks ago, Tracey sent out a tweet about this pasta from The Pioneer Woman, so I went to her blog to look at the recipe.
Her gorgeous photos and the fact that this pasta had to do with roasted red peppers, which I love, helped me decide to make this for dinner that night.
I had everything on hand, so it really didn't take long at all.
I used whole wheat pasta because that is what I always use.
I roasted my peppers in the oven, since I don't have a gas stovetop.
I also omitted most of the heavy cream at the end and just splashed in a couple Tbls of half and half instead.
Delicious!
Tracey's post and recipe for Pasta with Roasted Red Pepper Sauce
Pioneer Woman's post and recipe for Pasta with Roasted Red Pepper Sauce
One Year Ago-Chocolate-Chocolate Cupcakes
Posted by Mary Ann at 8:13 AM 14 comments
Labels: cheese, pasta, roasted red peppers, whole wheat
Friday, October 23, 2009
Spaghetti Squash and Chard Gratin
I found out about this recipe when Kalyn sent out a tweet about a new post on her blog. I immediately went over to her blog to check out the Spaghetti Squash and Chard Gratin.
I love spaghetti squash (although this love is fairly recent) and I also love swiss chard. I never in a million years would have thought to put the two together.
I put this down on my menu calendar and the next time I went for groceries, I found beautiful swiss chard and a nice sized spaghetti squash.
This recipe takes a little time, but it is completely worth it. Plus, you can roast your spaghetti squash during the day, when you are at home, before dinner time.
There are a few things that I did differently.
I always roast my spaghetti squash whole. I preheat the oven to 400 degrees, poke my squash all over with a fork or skewer, cover a baking sheet with foil and pop the squash in the oven. I usually let it roast for an hour, turning it once or twice. This to me, is way easier than trying to cut through it raw. Once it has roasted, you can slice the thing in half with no problem.
I also sauteed my swiss chard mixture a little too long. It wasn't completely my fault though. Some kind of emergency came up with one of my kids in the bathroom and so, you know how that goes.
I also used chard with red stems and chopped them up and saute them too.
I used greek yogurt instead of sour cream.
I topped my gratin with a combination of Italian seasoned breadcrumbs, grated Parmesan cheese and a little bit of canola oil- to bring the topping together.
Delicious! I tasted it straight out of the pan and it was so good. My kids liked it and so did my hubby. So nutritious too.
Check out Kayln's blog for great pics of this recipe and lots of other great recipes too.
Recipe for Spaghetti Squash and Chard Gratin
One Year Ago-Bulgur and Chickpea Stuffed Squash
Posted by Mary Ann at 7:39 AM 8 comments
Labels: breadcrumbs, cheese, cottage cheese, eggs, greek yogurt, parmesan, spaghetti squash, swiss chard