Monday, February 28, 2011

Hot Chocolate Brownies topped with Homemade Marshmallows

Last week my son celebrated his 9th birthday. He doesn't usually care for cake with frosting, so his birthday treat of choice is brownies. Last year he chose Mint-filled Brownie Cupcakes
and these Peanut Butter Swirl Brownies (in cupcake form).

This year we stumbled upon this Hot Chocolate Layer Cake with Homemade Marshmallows,
and my son decided his b-day treat should be a hot chocolate brownie topped with marshmallows.

Of course when I went to find a Hot Chocolate brownie recipe, I found two and had to do a comparison.
The Hot Cocoa brownies from NY City Dish were definitely very fudgy, gooey, and a little bit sweeter than the Hot Chocolate Brownies from Sugar Plum, which were firmer, and had a little bit more of a dark chocolate flavor. They were not cakey at all, but definitely the sturdier of the two. My neighbor tasted both and requested the recipe for the Hot Cocoa Brownies. It just depends on what your personal brownie preferences are.
I made the marshmallows from the cake recipe and they turned out amazing. I usually avoid recipes that require gelatin, but used it here. The texture was lovely and they were a lot of fun to make. Not scary at all. Although my sugar syrup did require 10 more minutes than the recipe stated, to come to the right temperature.
I cut some rounds out of the brownies and placed the marshmallows on top, then gave them a dusting of cocoa powder.
Then I realized I had some dipping chocolate in the fridge that was leftover from something and I warmed it up, dipped the marshmallows in it and stuck them to the brownies. This worked better for keeping the marshmallows in place.


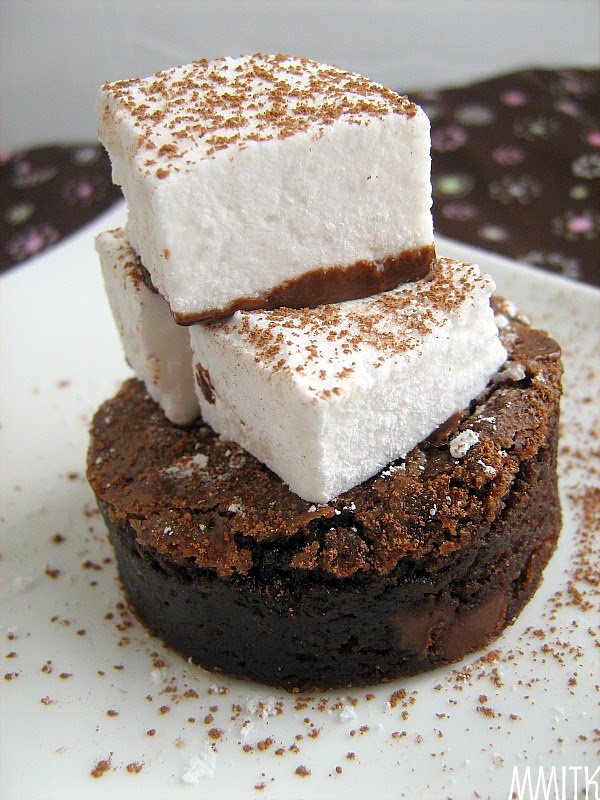
I also cut some brownies into little squares and took them to my son's school for a special treat. They were enjoyed by all.

Hot Chocolate Brownies adapted from Sugar Plum
3/4 cup all purpose flour
1/2 cup unsweetened cocoa powder
1 teaspoon baking powder
1/2 teaspoon salt
6 tablespoons unsalted butter, melted
3/4 cup granulated sugar
1 large egg
1/4 cup milk chocolate chips

Heat oven to 350 degrees F. Line an 8x8-inch baking dish with foil; coat foil with nonstick cooking spray.

In a medium mixing bowl, sift together flour, cocoa powder, baking powder and salt. In a large mixing bowl, whisk together melted butter, sugar and egg until well combined. Whisk in dry ingredients until just combined. Stir in milk chocolate chips until combined. Scrape batter into prepared dish.

Bake 20-25 minutes or until set and crusty looking around the edges.

Hot Cocoa Brownies
adapted from HERE
1/2 cup (1 stick) butter, melted
1 cup sugar
1 tsp vanilla extract
2 eggs
1/2 cup flour
1/3 cup cocoa powder
1/4 tsp baking powder
1/4 tsp salt
1/2 cup milk chocolate chips

Preheat oven to 350 degrees. Grease and flour baking pan. (I used an 8x8 metal pan)

Stir together butter, sugar, and vanilla in a large bowl. Add eggs and beat well.

In a separate bowl, stir together flour, cocoa powder, baking powder, and salt. Gradually add dry ingredient mix to the egg mixture and beat until blended. Add chocolate chips if desired. Spread batter evenly in pan.

Bake the brownies for roughly 20 minutes, until almost baked through.

Cool completely and sprinkle with decorative sugar, if desired. Should make roughly 16 brownies.

For the marshmallows from Fine Cooking
Three 1/4-oz. envelopes unflavored powdered gelatin
2 cups granulated sugar
1 cup light corn syrup
1/4 tsp. kosher salt
1 tsp. pure vanilla extract
1 cup plus 2 Tbs. confectioners’ sugar; more as needed

Make the marshmallows

Pour 3/4 cup cold water into the bowl of a stand mixer. Sprinkle the gelatin over the water. Attach the bowl to the mixer and fit it with the whisk attachment.

Clip a candy thermometer to a 3-quart saucepan; don’t let the tip of the thermometer touch the bottom of the pan. In the saucepan, boil the sugar, corn syrup, salt, and 3/4 cup water over medium heat without stirring until it reaches 234°F to 235°F, about 10 minutes (mine took about 20 minutes to hit the right temperature). With the mixer on low speed, pour the hot sugar mixture into the gelatin in a slow, thin stream.

Add the vanilla, carefully increase the speed to high, and beat until the mixture has thickened and cooled, about 5 minutes (the bottom of the bowl should be just warm to the touch). Line a 9x13-inch pan with foil, leaving an overhang on 2 sides. (I sprayed a 9x13-inch glass pan with cooking spray, instead of using foil. It worked great) Sift 1 Tbs. of the confectioners’ sugar into the bottom of the pan, then pour the marshmallow mixture into the pan and sift another 1 Tbs. confectioners’ sugar on top. Let sit at room temperature until set, at least 2 hours.

Use the foil overhang to lift the marshmallow from the pan. Using a knife that has been dipped in cold water, cut along the edge of the marshmallow to release it from the foil. Transfer to a cutting board and remove the foil. Put the remaining 1 cup confectioners’ sugar in a medium bowl. Cut the marshmallow into cubes of different sizes, from 1/4 to 3/4 inch (you will need to continue to dip the knife in cold water as you cut the marshmallows). The marshmallows will be very sticky—dip the cut edges in the confectioners’ sugar to make them easier to handle. As you work, toss a few cubes at a time in the sugar to coat, then shake in a strainer to remove the excess.

Idea came from this Recipe for Hot Chocolate Cake topped with Homemade Marshmallows

Friday, February 25, 2011

Collard Green & Black-eyed Pea Soup


Finally, the weekend is in sight and there might be a moment of relaxation. I can't wait.

At New Years', I cooked up a huge amount of fresh Black-eyed Peas and used some in both these Southern Egg Rolls and this Good Luck Dip. I still had quite a bit of them left, so I froze them in a Ziploc bag and decided to give myself some time to find another way to use them.

Somehow, I came across this soup and it looked really inviting. My kids like collard greens and have told me that they are easier to chew than kale. Collard greens are something that I have learned to like too and so I decided to give this soup a try.

I didn't use the bacon because I didn't have any and don't really like cooking it. The soup did not lack flavor at all. It was delicious. It was one of those nights when my kids just gobbled it down and I couldn't believe my eyes. I was so happy. No bribery had to happen to get them to eat this dinner.

The leftovers have made for a couple of really great lunches for me this week. I love it when that happens.

Recipe for Collard Green & Black-eyed Pea Soup
* I just topped the soup with a little shredded cheese
* I omitted the bacon

Wednesday, February 23, 2011

Garbanzo Beans and Greens & Herb-Marinated Pork Tenderloins

Wow- what a crazy busy couple of days I have had. And tomorrow is my son's b-day, so it is going to continue.

I wanted to share these 2 recipes, even though both of the pictures are horrid. That's what happens sometimes when there is no natural light and you put things in the fridge until the next morning and then try to get a picture! Oh, well. Just trust me when I say that these were both fabulous.

I served the garbanzo bean dish on a weeknight it was delicious. Really easy too.

I served the pork tenderloin a few days after Christmas, when we had company over. Pork loin is an easy one to serve to a crowd and this Barefoot Contessa recipe was wonderfully easy and tasty.

Sorry this is a just a quick post, but I have b-day stuff to organize!


Garbanzo Beans and Greens
from Cooking Light Magazine

2 center-cut bacon slices
1 cup chopped carrot
1/2 cup chopped onion
2 garlic cloves, minced
1 teaspoon paprika
1/4 teaspoon kosher salt
1/2 teaspoon ground cumin
1/2 teaspoon crushed red pepper
2 1/2 cups fat-free, lower-sodium chicken broth
1 cup water
2 (15-ounce) cans organic chickpeas (garbanzo beans), rinsed and drained
4 cups chopped fresh kale
1/2 cup plain 2% reduced-fat Greek yogurt
4 lemon wedges (optional)

1. Cook bacon in a Dutch oven over medium heat until crisp. Remove bacon from pan using a slotted spoon, and crumble. Add 1 cup carrot and chopped onion to drippings in pan, and cook for 4 minutes, stirring occasionally. Add garlic, and cook for 1 minute, stirring constantly. Add paprika, 1/4 teaspoon salt, cumin, and red pepper; cook for 30 seconds, stirring constantly. Stir in chicken broth, 1 cup water, and beans; bring to a boil. Reduce heat, and simmer for 20 minutes, stirring occasionally.

2. Add 4 cups kale to bean mixture. Cover and simmer for 10 minutes or until kale is tender, stirring occasionally. Ladle about 1 1/4 cups bean mixture into each of 4 bowls, and top each serving with 2 tablespoons yogurt. Sprinkle with bacon, and serve with lemon wedges, if desired


Herb-Marinated Pork Tenderloins from Ina Garten- The Barefoot Contessa
  • 1 lemon, zest grated
  • 3/4 cup freshly squeezed lemon juice (4 to 6 lemons)
  • Good olive oil
  • 2 tablespoons minced garlic (6 cloves)
  • 1 1/2 tablespoons minced fresh rosemary leaves
  • 1 tablespoon chopped fresh thyme leaves
  • 2 teaspoons Dijon mustard
  • Kosher salt
  • 3 pork tenderloins (about 1 pound each)
  • Freshly ground black pepper

Combine the lemon zest, lemon juice, 1/2 cup olive oil, garlic, rosemary, thyme, mustard, and 2 teaspoons salt in a sturdy 1-gallon resealable plastic bag. Add the pork tenderloins and turn to coat with the marinade. Squeeze out the air and seal the bag. Marinate the pork in the refrigerator for at least 3 hours but preferably overnight.

Preheat the oven to 400 degrees F.

Remove the tenderloins from the marinade and discard the marinade but leave the herbs that cling to the meat. Sprinkle the tenderloins generously with salt and pepper. Heat 3 tablespoons olive oil in a large oven-proof saute pan over medium-high heat. Sear the pork tenderloins on all sides until golden brown.

Place the saute pan in the oven and roast the tenderloins for 10 to 15 minutes or until the meat registers 137 degrees F at the thickest part. Transfer the tenderloins to a platter and cover tightly with aluminum foil. Allow to rest for 10 minutes. Carve in 1/2-inch-thick diagonal slices. The thickest part of the tenderloin will be quite pink (it's just fine!) and the thinnest part will be well done. Season with salt and pepper and serve warm, or at room temperature with the juices that collect in the platter.


Sunday, February 20, 2011

Cookies and Cream Cupcakes

Some flavor combinations just cannot be beat. One of those combinations for me is Cookies & Cream. I can remember growing up that was always the milkshake flavor I would choose if we happen to have the treat of getting a milkshake. I also have memories of my dad crushing up a package of Oreos, and mixing them into softened vanilla ice cream. It was a special treat.

The funny part for me though, is that I don't like to eat Oreos plain. They are something that I only buy on special occasion, when used in a Cookies and Cream combination, for a special recipe. Like this ice cream, which I made last summer and we absolutely loved.

When it comes to Cookies and Cream- the more chunks of cookie the better. And the bigger the cookie chunks the better.
And you can't use fake brand cookies. It has to be Oreos.

So these cupcakes are perfect. They have the perfect amount of cookie chunks. They have the perfect white cake base. The frosting is perfect. It tastes just like the cream that is in the middle of an Oreo. The frosting and cupcake are the perfect match.
I made these to celebrate the end of my son's basketball season and we served them at the team dinner, after the last game. To make them even more festive and to incorporate more Oreos, I made basketball toppers out of candy coated Oreos. They turned out perfectly. The kids and parents were equally excited about consuming these delicious cupcakes.

Oh, and by the way, my blog is 3 years old today. YAY!

Cookies and Cream Cupcakes
Yield:
24 cupcakes

Ingredients:
For the cupcakes:
24 Oreo halves, with cream filling attached
2¼ cups all-purpose flour
1 tsp. baking powder
½ tsp. salt
8 tbsp. unsalted butter, at room temperature
1 2/3 cup sugar
3 large egg whites, at room temperature
2 tsp. vanilla extract
1 cup milk
20 Oreo cookies, coarsely chopped (cut into quarters)

For the frosting:
8 oz. cream cheese, at room temperature
8 tbsp. unsalted butter, at room temperature
1 sp. vanilla extract
4 cups confectioners’ sugar, sifted
2 tbsp. heavy cream

For garnish:
Oreo cookie crumbs
24 Oreo cookie halves

Directions:
Preheat the oven to 350˚ F. Line the wells of two cupcake pans with 24 paper liners. Place an Oreo halve in the bottom of each liner, cream side up. In a medium bowl, combine the flour, baking powder and salt; stir together with a fork to blend and set aside. In the bowl of an electric mixer, combine the butter and sugar and beat together on medium-high speed until light and fluffy, about 2 minutes. Blend in the egg whites one at a time, beating well after each addition. Blend in the vanilla extract. With the mixer on low speed, beat in half of the dry ingredients just until incorporated. Add the milk and beat just until combined, then mix in the remaining dry ingredients. Gently fold in the chopped Oreos with a rubber spatula until evenly incorporated, being careful not to over-mix.

Evenly divide the batter between the prepared cupcake liners. Bake for 18-20 minutes, rotating the pans halfway through baking, until a toothpick inserted in the center comes out clean. Allow to cool in the pans 5-10 minutes, then transfer to a wire rack to cool completely.

To make the frosting, combine the cream cheese and butter in the bowl of an electric mixer and beat on medium-high speed until smooth, about 1 minute. Blend in the vanilla extract. Beat in the confectioners’ sugar until incorporated and smooth, 1-2 minutes. Add the heavy cream to the bowl and beat on medium-low speed just until incorporated, then increase the speed to medium-high and whip for 4 minutes until light and fluffy, scraping down the sides of the bowl as needed.

Frost the cooled cupcakes as desired. Sprinkle with Oreo crumbs and garnish with Oreo halves.

Source: slightly adapted from Annie's Eats, who adapted from Beantown Baker


Friday, February 18, 2011

Creamed Corn with Pancetta and Leeks


This is a recipe that I have been wanting to try for quite some time, but somehow it never fit into my menu. I never tried creamed corn until I moved to the South and it took some time for me to grow to like it.

I decided to make this for our Christmas dinner, since I did a southern dinner, and used grade A fresh frozen corn. I really wanted to make this with fresh corn, but it fit our Christmas dinner, so I went ahead and made it. I didn't use a cast iron pan and it still worked out great.

This was a little bit spicy (as in- onion spicy) from the leeks, but I think they gave a nice level of flavor. This recipe came together quickly and was really delicious.
I wish I could've gotten a beautiful picture, but it just didn't work out that way. Please look at the Cooking Light picture to have a feast for your eyes.
I'm excited to make this again during the summer with fresh cobs of corn.

Recipe for Creamed Corn with Bacon and Leeks
* I used some chopped pancetta instead of bacon
* I used fresh frozen corn instead of corn right off the cob


Wednesday, February 16, 2011

Chicken, Kiwi, and Mango Salad

Finally, it is beginning to warm up around here! I think Spring might be right around the corner. I'm so happy about this because the cold is going to leave and go away for a really long time!

The sun is shining and it is beautiful outside. Those two things make me think of fresh, springy (or summery) salads.

This is a salad that will make you feel happy and it is really easy to make. You just need a handful of ingredients. The dressing is made with mayo, but I used lowfat greek yogurt instead and it is flavored with ginger and lime. The kiwi and mango are delicious with the chicken and those cashews add just the right amount of crunch. Yum.

Recipe for Chicken, Kiwi, and Mango Salad
* I used greek yogurt instead of mayo

Monday, February 14, 2011

Raspberry Swirl Mini Cheesecakes

Happy Valentine's Day! I hope you have a fun day filled with red, pink, hugs, kisses, and that you are surrounded by people that you love.

I love Valentine's Day just because it is a great excuse to make heart shaped sugar cookies. This is the holiday that I associate with decorating cookies and I have a bunch of hearts waiting to be frosted. (I used this sugar cookie recipe).

But, this post is really about these delicious little cheesecakes. I made these a few weeks ago for someone who needed a treat to take to a work function. These were perfect because I could make them the night before and they just get better with refrigeration.

This recipe is straightforward and very simple. The results are creamy, dreamy, and delicious.
The little raspberry swirl adds a tart & sweet little burst of flavor that is divine.
I made some in a mini muffin pan and those little treats were the perfect size. What could be better than a two-bite serving of cheesecake? You could even swirl your raspberry puree into a heart for that special someone. Have a great day!

Recipe for Raspberry Swirl Mini Cheesecakes

Friday, February 11, 2011

Pink Lady Cake

This cake has been waiting for an appearance for over 3 months. It was the cake that my daughter chose for her birthday back in November, but because it was pink (due to strawberry puree) and that makes me think of Valentine's Day, I saved it until now.

My daughter was very specific about how she wanted her cake. It ended up being a 9*13-inch cake and a 6-inch round. I wasn't going to post this recipe originally, but the cake was so delicious that I changed my mind.
The cake has almost a velvet texture and the flavor is unbelievable. The strawberry puree makes the cake so delicious and the best part is that it isn't in a artificial way.

This would be a perfect sweet to share with someone/multiple someones' for V-day. It would also be perfect to share some other time, if you already have your dessert for this coming weekend planned. All I know is this cake is delicious, pink and fun to share with a crowd. I will definitely make it again when a pink cake is in demand.

The original recipe comes from Sky High, in which the cake is called Strawberry Butter cake, but the recipe I used I found on smitten kitchen. I used a cream cheese frosting that I was familiar with and that I knew would hold up to some decorating.


Recipe for Pink Lady Cake


Cream Cheese Frosting from Martha Stewart
2 sticks unsalted butter, room temperature
12 ounces cream cheese, room temperature
4 cups confectioners' sugar, sifted
3/4 teaspoon pure vanilla extract

Beat butter and cream cheese with a mixer on medium-high speed until fluffy, 2 to 3 minutes. Reduce speed to low. Add sugar, 1 cup at a time (scraping down the sides of the bowl occasionally), and then vanilla; mix until smooth.

The frosting can be made up to 3 days in advance. Refrigerate until needed, then bring to room temp and beat until smooth before using.

Wednesday, February 9, 2011

Fig and Ginger Truffles

Last summer I received a shipment of fresh figs and dried figs too. Pounds and pounds of figs.
Since then, I have been looking for interesting ways to use dried figs. I don't remember how I found this recipe, but it stuck out to me because it is a healthier way to have a truffle, or an excuse to have a little chocolate.

Now, you will not like this recipe if you do not like dried figs. The filling for these truffles is mostly dried figs, that are ground up in the food processor and combined with a few other things, like crystallized ginger and a little bit of honey.

The fig mixture is rolled into little balls-I made mine smaller than the recipe called for, since the recipe is only supposed to yield 16 truffles and I ended up with 26. Then the little balls of fig goodness are rolled in dark chocolate. I used Scharffen Berger, 70% cacao.

These truffles need a little time to set up in the fridge and then they are ready for eating or sharing. I actually shared some with a friend who doesn't eat gluten or dairy and happens to love figs. She said she really enjoyed them.
I put the rest in the freezer and have been enjoying them as a little treat. The ginger gives a little bit of spicy heat that really plays well with the flavors of the figs and the dark chocolate offsets the sweetness of the fig filling.


Recipe for Fig and Ginger Truffles
* I made 26 truffles

Monday, February 7, 2011

Lemon-Cranberry Muffins

Who out there still has bags of frozen cranberries in their freezer? Anybody?
I am pretty sure there are a few of you who stocked up on fresh cranberries when they were at a great price and stuck them in the freezer, just like I did. Cranberries stay good in the freezer for quite awhile and they are easy to use frozen, plus they thaw quickly. They are really quite perfect for these reasons.

I saw these muffins in Eating Well magazine and wanted to try them. I liked that the recipe called for a combination of white wheat flour and cornmeal. The cornmeal gave these muffins a nice texture and it went really well with the cranberries.

I love using cranberries in muffins and other baked goods, because the tartness evens out the sweetness that you might have. These muffins were perfectly delicious. Nice and tart, lemon-y and with bursts of cranberries all throughout them. I decided to use pink sanding sugar on top.
My kids really liked these too.

I wanted to freeze a couple and see how they did, warmed from the freezer, but they didn't last long enough for that to happen.

Recipe for Lemon-Cranberry Muffins
*I used low-fat buttermilk instead of plain yogurt


Friday, February 4, 2011

Turkey-Hummus Sliders

I saw this recipe in Food Network Magazine and thought it was such a fun idea. It was an out-of the ordinary way to use hummus (hummus is mixed into the ground turkey mixture) and perfect for little hands.

I can usually always find mini whole wheat pitas at my local grocery store, but as soon as I put these sliders on the menu, the mini pitas were nowhere to be found. At first I thought I would just turn this into a pita creation, putting all the ingredients into a pita half and eating it that way, but that kinda takes away the fun and cute part of this slider.

So, I just got full size whole wheat pitas and cut out small circles with a biscuit cutter, making sure that I kept the closed edge at the bottom, so the two sides would still stay together. It may not be as cute as the original idea, but it worked!

My husband really raved about this one, which kinda surprised me. (I left the tomato slice off of his). He loved the combination of the pita, hummus, little burger and the cucumber-feta mixture. He said it tasted great and reminded him of something that would be served in a restaurant. My kids really liked it too.

I think it is essential that all the parts of this slider be served together. I don't think that it would taste as good with just the sliders. The cucumber-feta mixture, whole wheat pita, and hummus spread on the bottom of the pita are must-dos. All of the components work together to make this a really tasty, bite-size winner of a meal/snack.

Recipe for Turkey-Hummus Sliders From Food Network Magazine
* I used 94% lean ground turkey
* I used roasted red pepper hummus
* I used dried oregano in the feta-cucumber mixture because I didn't have dried mint
* I used less oil to cook my sliders

Wednesday, February 2, 2011

Cooking Light Virtual Supper Club- Have a Heart/ Red Food Granny Smith, Radish, and Radicchio Salad


This month's theme for our Cooking Light Virtual Supper Club is Have a Heart/ Red Food. Quite a clever theme for the month that gives us Valentines Day, which is a celebration of red and hearts.

The theme was chosen by Val and she has some great information on her blog about why eating red foods is a great way to add valuable nutrition to your diet.
Here is how the menu turned out this month-
Val - More Than Burnt Toast - Bourbon and Brown Sugar Flank Steak w/Garlic-Chive Mashed Potatoes
Jamie - Mom's Cooking Club - Brushetta with Warm Tomatoes

Roz - La Bella Vita - Almond Jelly Roll with Raspberry Filling

I chose to make this Granny Smith, Radish and Radicchio Salad with Orange-Walnut Vinaigrette which caught my eye a couple of months ago in Cooking Light Magazine. I loved the colors in the salad and the combination of these flavors makes a salad that is spicy, crunchy, tart and delicious. The vinaigrette brings it all together, along with the chopped walnuts on top.
The radicchio and radishes were my red foods.

Check out the rest of the menu above- we have two new members joining our Virtual Supper Club this month, Welcome Jerry and Roz!


Recipe for Granny Smith, Radish, and Radicchio Salad


Tuesday, February 1, 2011

TWD- Great Grains Muffins


Today's Tuesday's with Dorie recipe- Great Grains Muffins, was chosen by Christine, who blogs over at Happy Tummy. You can find the original recipe on her blog.

I made these a few days ago and since I was still working my way through "the month without using or buying butter", I had to switch things up a bit in these muffins. I just used a little bit more low-fat buttermilk and some canola oil to make up for the butter that I cut out. I like muffins better when they aren't made with butter anyway, because then they seem healthier and more like breakfast food and less like cupcakes or dessert.

I also used more whole wheat flour than the recipe originally called for and used raw honey instead of maple syrup because I didn't have any maple syrup on hand. I used raisins and sunflower seeds for my mix-ins.

These muffins were delicious. They tasted healthy, but once again, that is what I like muffins to taste like. The oatmeal and cornmeal gave them great texture and flavor.

Go see what the other TWD-er's thought about these Great Grains Muffins by checking the LYL page over at TWD!

Great Grains Muffins

adapted from Baking From My Home to Yours by Dorie Greenspan

2/3 cup all purpose flour

2/3 cup whole wheat flour

1/3 cup cornmeal

1/3 cup old-fashioned oats

1/4 cup sugar

2 teaspoons baking powder

1/4 teaspoon baking soda

1/4 teaspoon salt

1 1/4 cup + 2 Tablespoons low-fat buttermilk

1/3 cup raw honey

2 large eggs

1/4 cup canola oil

1/3 cup raisins

1/3 cup roasted sunflower seeds

Preheat oven to 400 degrees. Butter or spray a muffin tin

In a large bowl, whisk together the flours, cornmeal, oats, sugar, baking powder, baking soda, and salt. In a large glass measuring cup, whisk together the buttermilk, maple syrup, eggs, and melted butter. Pour the liquid ingredients over the dry and gently, but quickly stir together. Don’t worry about being thorough — if the batter is lumpy, that’s fine. Stir in the fruit or nuts, if you are using them. Divide batter evenly among the muffin cups.

Bake for 16-18 minutes or until the tops are gold and a thin knife inserted into the center of the muffins comes out clean. Transfer the pan to a rack and cool for 5 minutes, then carefully lift each muffin out of its mold and onto the rack to cool