 Once upon a time there was the most gigantic butternut squash in the whole entire world.
I happened to find this huge squash and I bought it. It was 18 inches tall.
I was able to make this Bundt cake that had a couple cups of shredded butternut squash, these roasted veggies,
both of these stuffings/dressings, a soup (which I haven't posted yet) and I STILL had some squash left.
I roasted the rest of the squash cubes, along with a large chopped onion, in the oven with fresh oregano, fresh thyme, and fresh rosemary.
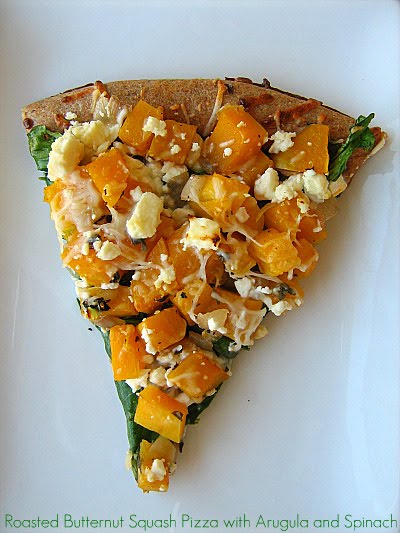
Then I remembered Maria's post about Pizza that was topped with butternut squash and I decided that sounded really good. I didn't follow her recipe, but I used her idea. I used a pre-made whole wheat crust, just because I had one that needed to be used. I also had some arugula and spinach that I thought would be great under the squash.
I drizzled my crust with a little bit of olive oil, heaped on tons of arugula and spinach and then topped the greens with my roasted butternut squash/onion mixture.
I sprinkled feta cheese and shredded mozzarella cheese on top and put it in the oven for a few minutes.
Ok, people. This was the most delicious pizza I have ever tasted. Ever. So good.
I can't tell you how great the flavors went with each other.
Unbelievable.
I know there are people out there that believe the simplier the better when it comes to pizza. I agree-sometimes.
This is a topping heavy pizza, but it is so good. And pretty too. And it just seems like it has to be good for you because of all the veggies.
That probably only applies if you don't eat the entire pizza yourself. Good luck with that.
Roasted Butternut Squash Pizza with Arugula and Spinach
pre-made whole wheat or regular pizza crust (Here is my fave quick crust)
3-4 cups butternut squash cubes
1 onion, chopped
fresh thyme
fresh oregano
fresh rosemary
salt and pepper
olive oil
spinach
arugula
feta cheese
shredded mozzarella cheese
Spread your butternut squash cubes and chopped onion on a large baking sheet. Drizzle with olive oil. Toss with fresh herbs, salt and pepper.
Roast at 425 degrees for 25 minutes or until squash is tender.
Make your crust and prebake if necessary.
Drizzle crust with a little bit of olive oil.
Spread arugula and spinach over crust.
Top greens with roasted butternut squash/onion mixture.
Sprinkle cheeses over squash mixture.
Bake in oven, until cheese is melted and crust is done.
Maria's Recipe for Roasted Butternut Squash Pizza
Wednesday, December 9, 2009
Roasted Butternut Squash Pizza with Arugula and Spinach
Tuesday, December 8, 2009
TWD- Lemon Ginger Sables
 This week's TWD recipe, Sables, was chosen by Barbara, who blogs over at Bungalow Barbara. You can find the recipe by going to this post on Barbara's blog or by turning to page 131 of Baking: from my home to yours, which I am sure you have a copy of by now.
This is a basic butter cookie that can be made with many variations. I decided to make a lemon-ginger version. I added the zest of 2 lemons to the sugar and also added 1 1/2 tsps of ground ginger to the cookie dough. These tasted really great.
You can make them any way you want, with any spice, any zest, any nut and also savory, if you desire.
This is the perfect cookie for this time of year. You can share and send these and the people who are so lucky to receive them will be very grateful.
Go check out the Tuesday's with Dorie Blogroll to see what other variations people came up with this week! I also just wanted to share some pictures of a cake I created for my friends daughter's 8th birthday party.
This cake was supposed to be decorated with candy, but when I was out shopping, I saw these little Christmas ornaments and the idea popped into my head to try decorating the cake with them.
It worked.
The cake looked so cute. The birthday girl was happy with her cake and so was I. I have made the cake before, about a year and a half ago, so I knew it was a good cake, with great flavor. Orange cake, raspberry jam between the layers and then a Swiss Meringue Buttercream to finish the whole thing off. Delicious.
Recipe for Orange Butter Cake
Monday, December 7, 2009
Gingersnap Shortbread
 Here is a cookie I made a couple of weeks ago and sent in the mail to a couple of people. I found it in a Better Homes and Gardens Holiday Baking Magazine. The recipe was very easy. This cookie has ground ginger and molasses in it, to give it the gingerbread flavor.
I thought this cookie needed more spice. Next time I am going to add more ginger, just to make sure it is a spicy cookie.
This is a super easy cookie to throw together and perfect for sharing. It mails well, so go ahead and make some- it will be easy to share!
Recipe for Gingersnap Shortbread
3 Christmas Cookies with one Dough-Chocolate Peppermint Pinwheels, Candy Cane Twists, and Peanut Butter Dips
 I made these Christmas cookies last year- check out the post here. My son picked them out. They are one of those cookies that you can make with one main type of dough, adding in different things to make a bunch of different types of cookies. We are definitely going to make these again. They were a big hit last year!
 Butter Cookie Dough from NickJr. Magazine Measurements for tripling are included in red

Saturday, December 5, 2009
Spiced Pecans, S'mores Cookie Bars, Chocolate Gingerbread Bars, and Peppermint Brownies, oh & a Birthday Cake
 I had so much fun this morning helping one of my best friends with her daughter's 8th birthday party. It was a tea party, very fancy. The cake I made was so cute. I had a great idea and it worked. Can't wait to get photos up of that cake.
I haven't yet, so these delicious treats will have to do.
The first thing here is Spiced Pecans. I made these a couple of weeks ago, along with the Holiday Biscotti as an idea for a Holiday Gift.
They were a big hit. They are coated in a sweet/spicy mixture. Mostly sweet, because of the cinnamon, sugar but also spicy because of the cayenne pepper and ground ginger.
Delicious. We couldn't stop munching on them. I am making a big double batch next week to send out with some cookies in the mail. Yum... Next, is a treat that I made for one of the Thanksgiving Dinners we went to. I was asked to bring a kid-friendly treat and remembered some S'mores Cookies that I had seen awhile ago.
What is more kid friendly than something covered in marshmallows and chocolate?
I thought I would turn these cookies into bars and just made them in a 9x13-inch pan, instead of making individual cookies. I let the pan of cookies bake for about 23 minutes or so, and then I dumped on an entire bag of mini marshmallows and some chopped Hersheys milk chocolate.
Put them back under the broiler and let the marshmallows get really toasted.
These were very sweet (not like that is a surprise or something) and had to be eaten in small doses. They were good. The graham cracker crumbs in the cookie base made them taste like a real S'more.
Ooey and gooey, which is a great combination for kids, even if parents might not agree! Next are Chocolate Gingerbread Bars. I threw these together for a potluck over Thanksgiving weekend. They came together really quickly and disappeared just as quickly. I think most people probably thought they were brownies, so they must have had a little surprise when they tasted the molasses/ginger. A great christmas treat.
 Then we had some Peppermint Brownies. I saw this idea in a Holiday Baking magazine, but can't remember which one it was. My sister was visiting for Thanksgiving and we had a lot of fun with all these marshmallows.
We just made basic brownies and then covered them with marshmallows, chopped candy canes and drizzled melted milk chocolate over the top.
Gooey and delicious. The last thing I wanted to share was a picture of the birthday cake my little girl got to share with her great grandpa. They share the same birthday, November 27th and we decided to celebrate with a sheet cake at our Thanksgiving Dinner. My mother-in-law requested the same cake that I made for her birthday back in July, so I just doubled it and tried out a new frosting recipe. The frosting recipe was really great to decorate with. It also had just a hint of cream cheese that was really delicious. I am definitely going to be using the frosting recipe in the future. You can find the frosting recipe at the bottom of this post. My sister helped me come up with the design for the cake. It was fun. The birthday girl and grandpa were very happy to share the cake and their birthdays with everyone.
 Recipe for Spiced Pecans
Recipe for S'mores Cookies
Recipe for Chocolate Gingerbread Bars
Recipe for Vanilla Buttercream
Friday, December 4, 2009
Holiday Biscotti
 It's that time of year. The time when you can start making, baking, sending, and sharing food gifts, if you so desire.
I made these Holiday Biscotti a couple of weeks ago when a group of women from church got together to share some ideas for Edible Holiday Gifts. I hadn't ever made this particular biscotti recipe before, but with dried cranberries and pistachios, these just seemed like the perfect Christmas treat.
They also have lemon zest which makes the flavor really great.
I dipped some in white chocolate and some in white almond bark-which I think holds up better because it doesn't melt. I also left some plain. These were really good. I recommend them for anyone who likes biscotti. They have great flavor and would make a great gift. Plus, they look pretty with the red and green which happen naturally.
Try them out and send them to someone you love. They will be thankful! (Make sure you taste one first!)
Recipe for Holiday Biscotti
Thursday, December 3, 2009
CEiMB- (rewind) Mom's Turkey Meatloaf
 This week for CEiMB the recipe was Confetti Chili and was chosen by Lauren over at I'll Eat You.
I did not make chili, obviously. Mainly because I made this pumpkin bean chili a couple weeks ago and my hubby is not a big fan of chili.
Instead I am posting Ellie's recipe for her Mom's Turkey Meatloaf.
Going back and making this recipe, which was the first recipe that was chosen for CEiMB, was Kayte's idea. She was working on making all the CEiMB recipes that were chosen before she joined the group. She mentioned she was making this on twitter and I already had ground turkey breast in my fridge, so I decided to jump in and make it too.
I have only made meatloaf once before in my life. It was when I was a newlywed and my husband was not a fan. I remembered that all these years, so I never made it again. Not to mention I am not a huge meat fan, so it has never really appealed to me.
I made a 1/2 recipe of this meatloaf and it was a big hit with my family.
I didn't have any tomato sauce, so I topped it with ketchup. I thought this made it just a little bit too sweet and I think it would have been better topped with tomato sauce.
My son really loved this. He asked for the leftovers in his lunch for school.
I thought the onion should have been diced thinner- it was too prominent. I do think this was a great way to get some oats into a meal, a real secret ingredient.
While this was ok for me and definitely a crowd pleaser for my family, I don't think I will be making it regularly- too many other exciting dishes to make.
But, if you make meatloaf regularly, this is a really nice way to lighten it up.
Check out the CEiMB Blogroll to see what everyone thought of the chili!
Recipe for Mom's Turkey Meatloaf
Wednesday, December 2, 2009
Cubano Sandwiches
 So what did I do with all the leftover Spice-rubbed Pork Loin? I know everyone out there has been dying to know. We could have just eaten it plain because it was so delicious, but in the November 2009 issue of Everyday Food, there was a recipe that called for the pork leftovers- Cubano Sandwiches.
I have never eaten a cubano sandwich or made one, but it looked like the type of meal my husband would love. Meat, more meat and cheese. Not to mention pickles and white bread.
I decided to give them a try, with a few healthy tweaks, of course.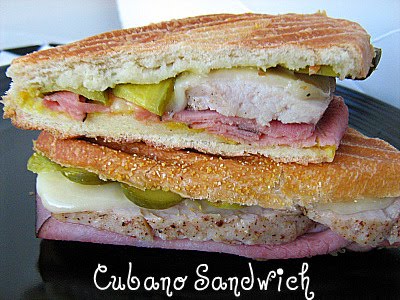 I completely omitted the butter from the recipe. Unless, I am baking or the butter actually plays an essential part in a recipe, I try to leave it out whenever possible.
I also reduced the amounts of meat, more meat and cheese that were on each sandwich. Usually when you see a picture of a cubano sandwich, the meat and cheese are piled high. I reduced it to just a slice or two of ham, one slice of cheese-cut in half, and two thin slices of pork.
Also, I was unable to find Portuguese rolls. I thought about making some, but decided to just use small hoagie rolls instead. I cut them in half, but not all the way through and then layered the sandwich fillings inside.
I also made these in my griddle/grill/panini press thing. Not sure what I mean? It is like this one, but a different brand. I basically just treated this sandwich like a panini and it was ready in minutes.
This was a hit with the entire family. Hubs loved it. Kids loved it. I even loved it. I would make the spice-rubbed pork again, just to make these sandwiches.
Cubano Sandwiches from Everyday Food November 2009
3 Tablespoons butter, room temperature (I omitted this)
4 Portuguese rolls, split (I used small hoagie rolls)
yellow mustard
1/2 pound thinly sliced deli ham (I used black forest ham)
1 pound Spice-rubbed Pork Loin, thinly sliced
1/2 pound Swiss cheese, thinly sliced
sliced dill pickles, to taste
1. Preheat oven to 425 degrees F. Butter inside of each roll (I skipped this step); spread with mustard. Divide ham, pork, and cheese among bottom halves of rolls. Top with pickles, more mustard to taste, and top halves of rolls.
2. Heat a grill pan and another heavy pan over medium. With a paper towel, lightly coat grill pan with butter. (I didn't do this) In batches, place sandwiches on grill pan and weight with second pan. Cook until bread is crisp on the outside, about 3 minutes per side; transfer grill pan to oven and bake sandwiches until cheese has melted, about 5 minutes. To serve, cut the sandwiches in half.
(I just used my 3-in-1: grill/griddle/panini press to make these. It is kind of like THIS Cusinart Griddler, but not that brand. I only had to put my sandwiches in my indoor grill/panini press and cook them until the cheese was melted. This eliminated some of the other steps)
Tuesday, December 1, 2009
TWD-Rosy Poached Pear and Pistachio Tart
 I have had my eye on this Rosy Poached Pear and Pistachio Tart ever since I got my copy of Baking:from my home to yours.
It just looks so beautiful and the combination of pears and pistachios sounds amazing.
Lauren, who blogs over at I'll Eat You chose this weeks TWD selection. You can find the recipe on her blog or on page 370 of Dorie's book.
I switched a couple of things in this recipe just because of things I had on hand at the moment.
I had candied pepitas and a mini pie crust leftover from this Pumpkin Cream Pie, so I decided I was going to make 1 mini pie, using the pie crust I had and the candied pepitas. I only poached one pear and I used juice instead of wine. My pear was not turning "rosy", so I decided to add a couple of drops of red food coloring to the poaching liquid.
Bad idea.
My pear was bright red. When I sliced it, it resembled imitation crabmeat. Not a good thing.
Oh well. I used it anyway, because I didn't have another pear.
I made 1/4 recipe of the pistachio pastry cream, which was really delicious. I left the nuts in.
All in all, this was a delicious tart.
I think it would be even better with a tart crust.
Go check out the TWD Blogroll and see what everyone else did with this week's recipe!
Monday, November 30, 2009
Spice-rubbed Pork Loin with Acorn Squash

(The MSC Bonus Cupcake post is below this one)
I am not usually excited about making recipes that have a big piece of meat as the star of the show, but for some reason this pork loin and squash recipe really caught my eye. I saw it in the November issue of Everyday Food and both parts look amazing. The caramelized squash just looked so delicious and the spice combination sounded perfect for the pork. I used a smaller pork loin than the recipe called for and for that reason, did away with one of the steps, which I noted in the recipe below.
The squash was so tender and delicious, it was simply amazing. The best acorn squash I have ever had.
The pork was an absolute hit. My hubby declared it the best meat he has ever tasted and my kids went crazy for it. The perfect combination.
Plus, I had enough pork and squash leftovers to make 2 other meals later in the week. That was even better.
You must try this recipe, I promise you will love it.
Spice-rubbed Pork Loin with Acorn Squash from Everyday Food November 2009
Ingredients
- 4 tablespoons extra-virgin olive oil
- 1/4 cup packed light-brown sugar
- 1/2 teaspoon ancho chile powder or other single chile powder
- 1/4 teaspoon ground cinnamon
- 1/2 teaspoon ground cumin
- 2 pounds acorn squash, seeded and cut into 1-inch-thick wedges
- 1 boneless pork loin (3 pounds), tied (I used a 1.5 pd pork loin, not tied)
- Coarse salt and ground pepper
Directions
- Preheat oven to 425. In a large bowl, stir together 3 tablespoons oil, sugar, chile powder, cinnamon, cumin, and 2 tablespoons water. Add squash and toss to coat. Set aside.
- Generously season pork with salt and pepper.( Heat a cast-iron skillet or other heavy pan over high. Add 1 tablespoon oil and swirl to coat. Cook pork on all sides until deep golden brown, about 10 minutes total. Place pork on a rimmed baking sheet; pour oil from skillet onto sheet and spread evenly. I skipped this step because my pork loin was smaller and I knew it wouldn't take as long to cook in the oven. I just added a little oil to the sugar mixture that I used on the squash)
- Arrange squash around pork. Brush pork with sugar mixture from bowl. Bake until pork is cooked through (an instant-read thermometer inserted in center should register 135 degrees), 40 to 45 minutes, brushing meat with sugar mixture and turning squash every 15 minutes. Tent pork with foil and let rest 10 minutes before slicing.
MSC Bonus- Applesauce Spice Cupcakes
 I decided to do the Bonus recipe for MSC (Martha Stewart's Cupcakes Club) yesterday morning. I made 1/4 of the recipe and I got 6 cupcakes.
I would have to say these turned out more like muffins because I decided to use whole wheat flour and they already had applesauce in them.
I upped the spices and instead of adding toasted pecans at the end to the batter, I decided to add gingersnap cookie crumbs that were leftover from the Pumpkin Pie Cheesecake that I made for Thanksgiving.
I also skipped the frosting because I was going for a muffin type breakfast item. I just dusted them with a little bit of powdered sugar.
My sister was very happy about these cupcake/muffins and they did seem a healthier than a normal cupcake.
To see who else made this month's bonus cupcake, check out the MSC Blog. You can find the recipe on page 55 of Martha Stewart's Cupcakes or here, where they are called muffins :)
Sunday, November 29, 2009
Cold Ginger, Soy, and Honey Sesame Noodles
 I hope everyone had a great weekend. I have really enjoyed spending some time with my sister and my family. We have had tons of Thanksgiving foods and just enjoyed a long weekend together.
This recipe is one that I have made several times, the first time I made it to send with my younger brother and my son in their lunches last year. Those of us who were able to sample it at home, loved it.
It is really easy to make and is supposed to be served cold. The sauce only has 5 ingredients, so you can whip it up in no time. I always use whole wheat angel hair pasta when I make this and then it feels like it is just a little bit healthier for you.
The flavors of the sauce are really delicious- honey, sesame oil, peanut butter, fresh ginger and tamari (which is just a thicker, darker and a little bit richer soy sauce). Yum.
Recipe for Cold Ginger, Soy, and Honey Sesame Noodles
Friday, November 27, 2009
CEiMB-Orange, Radish and Mint Salad, without the mint
 This week's CEiMB recipe was a free choice. We were given the opportunity to choose any recipe we wanted to try, although we were encouraged to make something we could bring to Thanksgiving dinner.
I decided to try this really simple salad because I have been wanting to try things that have radishes as a main ingredient.
I didn't share this at Thanksgiving, but I thought it was a pretty, yummy salad.
The sweetness of the oranges and the spicy hot of the radishes was really good together. I didn't really get the whole effect of the salad, because I didn't use fresh mint, but I used fresh parsley instead. I think the mint would add a nice kick to this salad.
I hope that everyone is having a great holiday weekend. Make sure you check out the CEiMB Blogroll to see what everyone else decided to try this week!
Recipe for Orange, Radish and Mint Salad
Wednesday, November 25, 2009
Cranberry and Vanilla Bean Sorbet
 This is my last recommendation for your Thanksgiving meal. I saw this recipe in a recent issue of Bon Appetit Magazine and the picture left me with no excuse not to make this sorbet.
I love cranberries. I started hoarding bags of them weeks ago, as soon as they appeared in my local Publix. I love how tart they are and their bright red color. They are so beautiful and good for you. I really don't think that cranberries get the attention that they deserve.
Anyway, I thought that the combination of cranberries and vanilla was very interesting and definitely something I would never have thought to combine.
The great thing about sorbets is that they are quick and easy to make. This one basically just combines all the ingredients and cooks them over the stove and then when the mixture has cooled you puree it in the food processor and then churn it in your ice cream maker. I reduced the sugar by about 1/4 cup.
I love what Bon Appetit had to say about this sorbet- "Here's a clean, bright dessert that makes a great finish to any meal and can be prepared days ahead. Plus, who knew that mellow vanilla would go so beautifully with tangy cranberries?"
I really think the words clean and bright are great ways to describe this sorbet. It would be the perfect ending to a Thanksgiving meal. Light and delicious. Tangy and sweet.
My girls, who are 5 and almost 3, loved, loved, loved this sorbet. *note- the recipe says to strain out the cranberry-vanilla bean mixture before you churn it, but I opted not to do this. I like seeds and skins and they really were not that noticeable in this sorbet.
Recipe for Cranberry and Vanilla Bean Sorbet
Happy Thanksgiving!

 Posts
Posts