Saturday, May 30, 2009

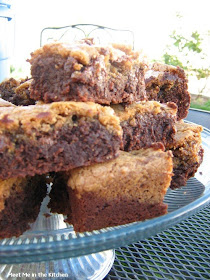
Brownies with Mint Buttercream and Chocolate Glaze

We made it to Georgia! We arrived here on Thursday night after driving through 10 states. It took us about 4 days all together. We stopped at the Grand Canyon and a few other places along our way and it actually was a lot more fun than I thought it was going to be. The kids really didn't seem to mind the fact that they were in the car for days on end. We unloaded our stuff yesterday morning and today we are off to find a house. Wish us luck! Thanks everyone for continuing to check out my blog. I haven't had a chance to really read the comments or visit any other blogs, but hopefully soon I will be able to do that. Now on to the goodies.
I always seem to be making baked goods and giving them away. That was the case with these brownies. Desserts were needed at some sort of function and I volunteered to make a couple of items.

I made these a couple of months ago, in March.
I had leftover mint buttercream from these cupcakes, and found this recipe that would use up the frosting.
Everybody likes the combination of chocolate and mint, right?
From what I heard, these brownies were very popular and I had a couple of people who called me for the recipe.
That is all I can really think to say. If you like brownies, try these and let me know what you think.


4 oz. unsweetened chocolate
8 Tbls unsalted butter, at room temperature
1 1/4 cups plus 1 Tbls all-purpose flour
1/2 tsp vanilla extract
3 large eggs, at room temperature
3/4 cup all-purpose flour

1. Preheat the oven to 325 degrees F. Lightly grease an 8-inch square pan with baking cooking spray.
2. Melt the chocolate and butter in the top of a double boiler placed over simmering water. Cool the mixture for 5 minutes.
3. Place the sugar in a medium-size mixing bowl and pour in the chocolate mixture. Using an electric mixer on medium speed, mix until blended, about 25 seconds. Scrape the bowl with a rubber scraper.
4. Add the vanilla. With the mixer on medium-low speed, add the eggs one at a time, blending after each addition until the yolk is broken and dispersed, about 10 seconds. Scrape the bowl after the last egg and blend until velvety, about 15 more seconds.
5. Add the flour on low speed and mix for 20 seconds; finish the mixing by hand, being certain to mix in any flour at the bottom of the bowl. Stir in 1/2 cup nuts, if using.
6. Spread the batter evenly in the prepared pan.
7. Bake the brownies on the center oven rack until a thin crust forms on top and a tester inserted in the center comes out with a moist crumb, about 35 minutes.
8. Remove the pan from the oven and place it on a rack to cool for 1 hour before cutting the brownies.
Mint Buttercream
1 cup confectioners sugar
4 Tbls unsalted butter, at room temperature
2 tsp peppermint extract
Chocolate Glaze
4 oz bittersweet chocolate
2 teaspoons light corn syrup
1. To prepare the buttercream, using an electric mixer on high speed, cream the sugar, butter and extract together until fluffy, 2 to 2 1/2 minutes.
2. Spread the buttercream evenly over the cooled brownies and freeze for 1 hour.
3. After an hour, melt the chocolate for the glaze in the top of a double boiler placed over simmering water. Remove the pan from the water, and stir the syrup into the melted chocolate.
4. Allow the glaze to cool to the point where it no longer hot but still loose and spreadable. Using a frosting spatula, spread the glaze over the buttercream. Immediately place the pan in the refrigerator and allow the chocolate to harden for about 30 minutes
5. Cut the brownies with a thin, sharp knife that has been dipped in hot water and dried before each cut.
Up Next- Citrus Poppyseed Cake

Friday, May 29, 2009

Vanilla Bean Shortbread

I threw these shortbread cookies together one day right after dinner because everyone was begging for some dessert and I knew they would be ready fast. After I started mixing the ingredients together, I realized that I was out of canola oil and all I had was olive oil. I figured it wouldn't matter and went ahead and finished the cookies.
I have decided that I really like baking shortbread cookies in a 9x13-inch pan and then cutting them after they are done baking. They look better and it makes the process really easy.
I wasn't expecting anything great from these because they seemed so simple, but they were really good! My kids loved them. I think I will probably make them again when I need a quick and simple treat.

Hopefully I will be near a computer soon and I can tell you if we made it to our new living destination!

Vanilla Bean Shortbread from Cooking Light
"This half-oil, half-butter version yields a crisper, more delicate cookie," says Cooking Light Advisory Panelist Greg Drescher of the Culinary Institute of America.
Make up to five days in advance, and store in an airtight container.
Cooking spray
9 ounces all-purpose flour (about 2 cups)
1/4 cup cornstarch
1/4 teaspoon salt
1/2 cup butter, softened
1/2 cup canola oil (I used olive oil)
1/2 cup sugar
1 vanilla bean, split lengthwise
1. Preheat oven to 350°.
2. Line bottom and sides of a 13 x 9–inch baking pan with foil; coat foil with cooking spray, and set aside.
3. Weigh or lightly spoon flour into dry measuring cups; level with a knife. Combine flour, cornstarch, and salt in a large bowl; stir with a whisk.
4. Place butter in a medium bowl; beat with a mixer at medium speed 2 minutes or until light and fluffy. Add oil; beat with a mixer at medium speed 3 minutes or until well blended. Gradually add sugar, beating well. Scrape seeds from vanilla bean, and add seeds to butter mixture; discard bean. Add flour mixture, beating at low speed just until blended. Spoon dough into prepared pan. Place a sheet of heavy-duty plastic wrap over dough; press to an even thickness. Discard plastic wrap. Bake at 350° for 30 minutes or until edges are lightly browned. Cool in pan 5 minutes on a wire rack; cut into 32 pieces. Carefully lift foil from pan; cool squares completely on a wire rack.
Coming Tomorrow- Brownies with Mint Buttercream and Chocolate Glaze

Thursday, May 28, 2009

Thai Red Curry Risotto


This is another recipe that I had hanging out in my drafts that I haven't had a chance to blog about yet.
I have tried lots of risotto recipes and also have a thing for red curry paste, so this recipe was a no-brainer. Of course, when I saw it, I knew I was going to make it.
The combination of flavors in this risotto was good.
We all liked it, but it was a little strange to be eating Thai-flavored risotto. Those 2 things don't really seem to go together. I once again realized that I don't really care for peas in risotto, they added a little too much sweetness for me.
Definitely interesting and different. This was a fun dish, but I don't think I am going to be making it all the time.
Thai Red Curry Risotto
Notes: Thai red curry paste is available in many supermarkets. It's hot - add more or less to suit your taste. This risotto also works well without interruption; just leave it on the heat after step 3 and continue with step 4.
1 onion (about 6 oz.), peeled and chopped
3 tablespoons grated peeled fresh ginger
2 cloves garlic, peeled and chopped
1/4 cup grape seed or other salad oil
2 teaspoons paprika
3/4 teaspoon Thai red curry paste (see notes)
1 1/2 cups arborio or other short-grain white rice
1/2 cup dry sherry
About 4 cups fat-skimmed chicken broth
4 ounces fresh shiitake mushrooms, rinsed, stems removed, and sliced; or common mushrooms, rinsed, tough stem ends trimmed, and sliced
1 cup coconut milk (regular or low-fat; stir before measuring)
1 1/2 cups frozen petite peas
3 tablespoons chopped fresh cilantro
Salt
1 lime (about 3 oz.), rinsed and cut into 6 wedges
1. In a 12-inch frying pan or 14-inch wok over medium heat, stir onion, ginger, and garlic in oil until onion is barely limp, about 2 minutes.
2. Stir in paprika, curry paste, and rice, mixing well to coat rice. Pour in sherry and cook, stirring to scrape up any browned bits, until sherry is absorbed, about 2 minutes.
3. Pour in 1 cup chicken broth and stir until broth is mostly absorbed, 3 to 4 minutes. Add mushrooms and coconut milk; stir gently until liquid is mostly absorbed, about 1 minute. Add 2 more cups broth, 1 cup at a time, stirring after each addition until almost absorbed, about 15 minutes total. Rice should be almost tender but still slightly firm to bite. Remove from heat and let stand, uncovered, up to 4 hours.
4. Return pan to medium-high heat, add 1 more cup broth, and stir until liquid is absorbed and rice is creamy and tender to bite, about 9 minutes. If risotto is too dry or rice isn't quite tender, add a little more broth and cook until risotto reaches desired consistency. Stir in peas, cilantro, and salt to taste. Spoon risotto into serving bowls and garnish each serving with a lime wedge.


Coming Tomorrow- Vanilla Bean Shortbread

Wednesday, May 27, 2009

Poppy Seed Cake with Lemon Glaze

This is another cake I made a couple of months ago for a dinner. I have actually made this cake once before and knew it was good and moist, so I figured it was a perfect candidate for giving away.
It is dense like pound cake and very lemony, but the lemon glaze keeps it moist and delicious.
Sorry this is a ridiculously short post, but I had this in my hanging out in my drafts and figured this week would be the perfect time to share it. Enjoy!

Poppy Seed Cake with Lemon Glaze (from Better Homes and Gardens)
Ingredients
3/4 cup butter
4 eggs
2 cups all-purpose flour
1 tsp. baking soda
1/2 tsp. salt
1-1/2 cups granulated sugar
1/4 cup poppy seeds (about 1 oz.)
1 8-oz. carton dairy sour cream
1 recipe Lemon Glaze*
Directions
1. Let butter and eggs stand 30 minutes. Preheat oven to 350 degrees F. Grease and flour 10-inch fluted tube pan; set aside.
2. In medium bowl combine flour, baking soda, and salt; set aside. In large mixing bowl beat butter on medium 30 seconds. Gradually beat in sugar. Beat in eggs and poppy seeds. Alternately add flour mixture and sour cream to butter mixture; beat on low after each addition just until combined. Spread evenly in prepared pan.
3. Bake 40-45 minutes or until a wooden pick inserted near center comes out clean. Cool in pan on rack 10 minutes. Meanwhile, prepare Lemon Glaze. Remove and invert cake on rack; poke all over with fork tines. Brush glaze over cake. Serve immediately or cover and refrigerate. Makes 16 servings.
4. *Lemon Glaze: In small saucepan heat 1/4 cup sugar, 1/4 cup lemon juice, and 2 Tbsp. butter over medium-low heat until butter is melted and sugar is dissolved.
Makes 16 servings.


Coming Tomorrow- Thai Risotto

Tuesday, May 26, 2009

TWD- Chipster Topped Brownies

This weeks' Tuesdays with Dorie recipe was picked by Beth, who blogs over at Supplicious. You can find the recipe for Chipster Topped Brownies over on her blog, or you can buy a copy of Baking: from my home to yours, which is exactly what one of the women with whom I shared this treat did. She called me, asked for the recipe, looked at the book and ordered one for herself. Smart woman!

Dorie really out did herself here. She makes an outrageous brownie batter and tops it with chocolate chip cookie dough. The 2 doughs combine during the baking process and make a delicious, decadent bar of gooey, chocolately yumminess. Even the batter was scrumptious. It made my little fairy dance with joy!
I didn't have any trouble spreading the chocolate chip cookie dough over the brownie batter- there was definitely enough to cover it. I used pecans in the brownie layer and milk chocolate chips in the cookie dough.
Luckily, I was able to take these to a little cooking thingie in my neighborhood and you bet they disappeared fast. Raves and more raves for this cookie-brownie combination. Check out what everyone else thought by going through the TWD Blogroll!

And in case you are wondering, we should be somewhere in New Mexico, Texas or Oklahoma by the time this posts. Keep your fingers crossed that we make it to Georgia by Friday!
Up Next- Poppy Seed Cake with Lemon Glaze

Sunday, May 24, 2009

Banana Cake with Chocolate Buttercream Frosting

I don't usually make something twice. Unless it is really, really good.

So, when my friend asked me to make a couple of cakes for a family celebration, I thuoght back to this delicious banana cake with chocolate frosting. I made it for my son's 6th birthday and I remember how good it was. The cake is super moist, studded with delicious pecans, and the chocolate frosting is divine. The actual monkey was very difficult to decorate because although this frosting is delicious, it is very hard to spread or decorate with, but the taste makes it worth trying.
The second time I made the cake, we decided the monkey wasn't necessary and just made a double layer cake. I still made the yellow buttercream, just so there would be a splash of color to make it more interesting.
They loved it. If you need a party cake, this one tastes delicious and can please kids or adults and usually ends up doing both!

Monkey Cake from Martha Stewart
An animal theme can really get things swinging at a kid's birthday party. Indulge your child's penchant for monkey business with a fanciful banana cake with chocolate buttercream icing shaped and decorated to look like a curious friend.
Ingredients
Serves 10 to 12.
3/4 cup (1 1/2 sticks) unsalted butter, softened, plus more for pan
3 cups sifted cake flour (not self-rising), plus more for dusting
1 1/2 teaspoons baking soda
3/4 teaspoon baking powder
3/4 teaspoon salt
1 teaspoon ground cinnamon
3 very ripe, large bananas, mashed (about 1 1/3 cups)
3/4 cup buttermilk
1/2 teaspoon vanilla extract
1 1/2 cups packed light-brown sugar
3 large eggs
1 cup chopped pecans, optional
Fluffy Chocolate and Yellow Buttercreams
2 black-licorice drop candies
Black-licorice rope, for decorating
Directions
Preheat oven to 350 degrees. Butter and flour an 8 1/2-inch-diameter 3-quart stainless-steel or ovenproof bowl and 1 cup of a large (1-cup capacity) muffin tin; set aside.
In a medium bowl, whisk together flour, baking soda, baking powder, salt, and cinnamon. In a separate medium bowl, whisk together bananas, buttermilk, and vanilla.
In the bowl of an electric mixer fitted with the paddle attachment, combine butter and brown sugar; mix on medium-high until pale and fluffy, about 2 minutes. Mix in eggs. Reduce speed to medium; mix in flour mixture in 2 batches, alternating with banana mixture. Stir in pecans.
Fill prepared muffin cup three-quarters full. Transfer remaining batter to prepared baking bowl. Transfer to oven, side by side. Bake cupcake until a cake tester comes out clean, about 30 minutes.
Let cool in tin on a wire rack. Continue baking large cake until a cake tester comes out clean, about 1 hour and 10 minutes more (1 hour and 40 minutes total). Let cool in bowl on a wire rack 30 minutes. Invert bowl to remove cake; let cool completely.
Trim flat side of cake to be level. Trim away top of cupcake to be level. Cut cupcake in half vertically for the two monkey ears. Cut bowl cake in half horizontally to make 2 layers. Spread 3/4 cup chocolate buttercream on top of flat layer. Top with domed layer. Transfer to a cake plate. Spread a thick layer of chocolate buttercream over entire monkey head. Spread buttercream over cupcake ears. Attach ears to sides of head, top of cupcake facing forward, securing with toothpicks.
Place remaining chocolate frosting in a piping bag fitted with a small plain round tip (such as Ateco #5). Pipe dots around bottom edge of cake in a continuous line. Switch to a small multi-opening tip (such as Ateco #233); pipe hair on top of head.
Fill another piping bag fitted with a large plain round tip (such as Ateco #11) with yellow buttercream. Pipe an oval near the front base of cake. Fill in with frosting, and smooth. Place 2 small pieces of licorice rope inside for nose. Add a long piece of rope for mouth. Place licorice drops above oval for eyes. Pipe yellow half-circles in centers of ears; fill in with frosting, and smooth. Decorated cake can be refrigerated up to 3 hours.

Fluffy Chocolate and Yellow Buttercreams
Ingredients
Makes 3 3/4 cups chocolate frosting and 1 1/4 cups yellow frosting.
1 pound (4 sticks) unsalted butter, softened
1 teaspoon vanilla extract
5 1/4 cups sifted confectioners' sugar
Yellow food coloring
3/4 cup unsweetened cocoa powder
Directions
In the bowl of an electric mixer fitted with the paddle attachment, combine 1 stick butter, 1/2 teaspoon vanilla, and 1 1/2 cups sugar; mix on medium-high speed until pale and fluffy, about 2 minutes. Stir in food coloring to make pale yellow. Transfer to a small bowl; cover.
Put remaining 3 sticks butter in mixing bowl. Beat on medium-high speed until pale and creamy, about 2 minutes. Reduce speed to medium; add cocoa. Mix until smooth. With mixer running, add remaining 3 3/4 cups sugar, 1 cup at a time. Add remaining 1/2 teaspoon vanilla; mix on high speed until incorporated, 10 to 20 seconds more.

Up Next- TWD- Chipster Topped Brownies

Friday, May 22, 2009

Coconut Cupcakes with Lime Buttercream

This recipe caught my eye in the last issue of Cooking Light. It was on the very last page, so I am sure that is what it was intended to do.
We were taking dinner to someone and I thought this was the perfect dessert to share.
I always end up doing that. I make something I have never tried before and give it to people. I guess I just have faith that most recipes will turn out deliciously.
Am I the only one who does that?
Maybe it is because I like trying new things all the time.
Anyway, I had some lite coconut milk leftover in the fridge, so I decided to sub half of the milk called for with the coconut milk. Just for an extra dash of flavor.
I didn't have any trouble finding potato starch, which I have never used before and I am not really sure if it affected the texture or taste of these cupcakes.
We loved them. I doubled the recipe so I would have enough to share and some to try.
The best part was the frosting. I used the leftovers on the Fresh Mango Bread Muffins I made a couple of days ago. Yum-my!


We are moving this weekend to Georgia! My husband is flying in tomorrow night and then we are packing the truck and heading out of here on Monday morning. We are taking our time, trekking across the U.S. and making stops along the way. We hope to be in Georgia by friday night. I have made enough treats and meals in the past couple weeks, that I will still have new material to blog about, so keep coming back to check in and have a good weekend!
Coconut Cupcakes with Lime Buttercream Frosting from Cooking Light
Find potato starch in the supermarket baking aisle. Use lemon rind and fresh lemon juice in place of the lime for a variation.
Cupcakes:
Cooking spray
4.5 ounces all-purpose flour (about 1 cup)
3 tablespoons potato starch
1 teaspoon baking powder
1/2 teaspoon salt
3/4 cup sugar
2 tablespoons butter, softened
1 large egg
1 large egg white
2/3 cup fat-free milk (I used 1/3 cup lite coconut milk and 1/3 cup fat-free milk)
2 tablespoons flaked sweetened coconut
1/2 teaspoon vanilla extract
Frosting:
3 tablespoons butter, softened
1 teaspoon half-and-half
1/2 teaspoon grated lime rind
1 tablespoon fresh lime juice
4.75 ounces powdered sugar, sifted (about 1 1/3 cups)
1. Preheat oven to 350°.
2. To prepare cupcakes, place 2 muffin cup liners in each of 12 muffin cups; coat liners with cooking spray.
3. Weigh or lightly spoon flour into a dry measuring cup; level with a knife. Combine flour and next 3 ingredients (through salt) in a small bowl; stir with a whisk.
4. Combine 3/4 cup sugar and 2 tablespoons butter in a large bowl; beat with a mixer at medium speed until blended (mixture will be the consistency of damp sand). Add egg and egg white, one at a time, beating well after each addition. Add flour mixture and milk alternately to egg mixture, beginning and ending with flour mixture. Fold in coconut and vanilla.
5. Spoon batter evenly into prepared muffin cups. Bake at 350° for 18 minutes or until cupcakes spring back when touched lightly in the center. Cool in pan 2 minutes; remove from pan. Cool completely on wire rack.
6. To prepare frosting, combine 3 tablespoons butter and next 3 ingredients (through juice) in a medium bowl; beat with a mixer at medium speed until smooth. Gradually add the powdered sugar, beating just until smooth. Spread about 2 1/2 teaspoons frosting onto each cupcake.


Coming on Sunday- Banana Cake with Chocolate Buttercream Frosting

Thursday, May 21, 2009

CEiMB- Thai-Style Halibut with Coconut-Curry Broth and Thai Salad with Peanut Dressing

This week's host for CEiMB is The Not So Skinny Kitchen. The recipe selected for our enjoyment was Thai-Style Halibut with Coconut-Curry Broth. I have to say that I was very, very, very, excited about this recipe because I have been using red curry paste alot lately and it has become one of my favorite things. Plus, we all love fish in this house and the whole thing together just sounded superb.
Amazing!!! This recipe got the best reviews of anything I have made in weeks. I had people scraping out the pan to get every last inch of the sauce to put on the halibut. The coconut milk and chicken stock tone down the red curry paste so that even my little ones loved it. The lime juice, cilantro, and scallions that are stirred into the sauce at the end, give the sauce an extra little zing.
We loved it. Serving it with brown rice and spinach is just perfect. I will definitely make this again. I splurged and bought halibut to go with this meal and I am glad I did, but I am sure that it would taste great with any other firm white fish. Great pick.

Since I can't seem to ever get enough veggies in at one meal and we all love salad, I decided to serve the Thai Salad I saw in a recent issue of Cooking Light alongside the halibut. The peanut dressing was really thin, but the flavors were good.
This was a great, healthy meal that pleased everyone at the table.
Go see what the other Ellies' thought of this recipe by visiting the Craving Ellie Blogroll!

Thai-Style Halibut with Coconut-Curry Broth 2006, Ellie Krieger
Ingredients
2 teaspoons vegetable oil
4 shallots, finely chopped (about 3/4 cup)
2 1/2 teaspoons red curry paste*, or 2 teaspoons curry powder
2 cups low-sodium chicken broth (I used chicken stock)
1/2 cup light coconut milk
1/2 teaspoon salt, plus 1/4 teaspoon, plus more for seasoning
4 (6-ounce) pieces halibut fillet, skin removed
Steamed spinach**
1/2 cup coarsely chopped fresh cilantro leaves
2 scallions, green part only, thinly sliced
2 tablespoons fresh lime juice
Freshly ground black pepper
2 cups cooked brown rice, for serving
Directions
*Available in the Asian section of most supermarkets
**Steam or microwave 5 cups of washed baby spinach for 2 minutes
In a large saute pan, heat the oil over moderate heat. Add the shallots and cook, stirring occasionally, until beginning to brown, 3 to 5 minutes. Add the curry paste and cook, stirring, until fragrant, about 30 seconds. Add the chicken broth, coconut milk, 1/2 teaspoon salt and simmer until reduced to 2 cups, about 5 minutes.
Season the halibut with 1/4 teaspoon salt. Arrange the fish in the pan and gently shake the pan so the fish is coated with the sauce. Cover and cook until the fish flakes easily with a fork, about 7 minutes.
Arrange a pile of steamed spinach in the bottom of 4 soup plates. Top with the fish fillets. Stir the cilantro, scallions, and lime juice into the sauce and season, to taste, with salt and pepper. Ladle the sauce over the fish and serve with rice.


Thai Salad with Peanut Dressing from Cooking Light this only makes 2 servings, so I doubled the recipe
"These ingredients reflect the types of food my family enjoys year-round—fresh herbs and vegetables from our garden and local farmers. Sometimes we add chopped cooked chicken or my husband's fresh fish catch of the day for a main dish." —Maureen Nibecker, Honokaa, Hawaii
Dressing:
3 tablespoons water
2 tablespoons rice wine vinegar
1 tablespoon chopped green onions
1 tablespoon reduced-fat peanut butter
1 tablespoon low-sodium soy sauce
1 teaspoon grated peeled fresh ginger
1 teaspoon Sriracha (hot chile sauce, such as Huy Fong)
1 teaspoon dark sesame oil
2 teaspoons dry-roasted peanuts
Salad:
2 cups mixed baby salad greens
1/2 cup fresh bean sprouts
2 tablespoons vertically sliced red onion (I omitted this)
2 tablespoons fresh mint leaves
2 tablespoons fresh cilantro leaves
6 baby carrots, peeled (I used matchstick carrots)
4 cherry tomatoes, quartered (I used plum tomatoes)
1. To prepare dressing, combine the first 8 ingredients in a blender; cover and process until smooth. Add peanuts; process 10 seconds.
2. To prepare salad, divide greens and remaining ingredients evenly between 2 serving plates. Drizzle each salad with 1/4 cup dressing.


Up Next- Coconut Cupcakes with Lime Buttercream

Wednesday, May 20, 2009

Asian Chicken and Mango Salad

I decided to go with a another dish that called for mangoes, since I found 3 really lovely mangoes and didn't use all of them in the quick bread for TWD.
This salad was sooo easy and really good. I reduced the amount of oil in the dressing, just because I always do and it leaves more room for flavor from the other dressing ingredients.
I had a hard time finding a plain old rotisserie chicken. There were so many flavors, I was beginning to think I was going to have to roast my own. But then I found a salt and pepper only chicken and took it home and had this salad ready in about 15 minutes.
We have been eating the leftover dressing on salad greens and sprinkling peanuts on top.
It was really a great dinner.

Asian Chicken and Mango Salad adapted from Redbook Magazine
Sesame-Soy Dressing
1 1/2 tablespoons fresh gingerroot, grated
1 1/2 teaspoons garlic, minced
2/3 cups canola oil (I used 1/3 cup)
1/3 cup rice vinegar (I used 1/4 cup)
1 1/2 tablespoons toasted sesame oil
1/4 cup reduced-sodium soy sauce
1/4 cup water
2 tablespoons honey
1/2 teaspoons freshly ground black pepper
Salad
1 store-bought rotisserie chicken
1 large ripe mango, halved, pitted, and diced
1 large seeless cucumber, quartered lengthwise, cut into chunks
1 small red onion, chopped
1/2 teaspoons kosher salt
8 cups mixed salad greens
lime wedges, for garnish
Directions
Dressing:
Combine the sesame-soy dressing ingredients in a 2-cup jar; cover jar with a tight-fitting lid and shake well to dissolve the honey. Store covered in the refrigerator up to 3 weeks.
Salad: Remove skin and bones from rotisserie chicken and pull into long shreds. Toss chicken in a large bowl with mango, cucumber, red onion, and salt.
Add 1/2 cup of dressing and toss to lightly coat. Serve chicken salad over watercress or mixed greens. Garnish with lime wedges.


Coming Tomorrow- CEiMB- Thai Style Halibut with Coconut Curry Broth

Tuesday, May 19, 2009

TWD- Fresh Mango Bread

This week's TWD recipe, Fresh Mango Bread, was chosen by Kelly who blogs over at Baking with the Boys. You can find the recipe on her blog or check out this post from when I made this about a year ago. Last year when I made it I used Mott's Fruit flavored unsweetened applesauce, the Mango Peach flavor, in place of some of the oil and the results were fabulous.
This time I wanted quicker results, so I made this recipe into muffins. I had nice, large, juicy, ripe mangoes and a happy helper. She was really curious about the pit of the mango and was trying to find it. (She even ate some of the peel! we really didn't waste any of our mangoes!)
I made the full recipe and got 21 muffins. I only baked them for 22 minutes and they were done. Nice and golden brown. I used lemon zest, substituted half of the flour with whole wheat flour, subbed chopped pecans for the raisins, and drizzled half of the muffins with some leftover lime buttercream frosting that I thinned with a little lime juice and milk. (I will be posting the recipe for the cupcakes and lime buttercream later this week).
We all really liked this recipe, that is part of the reason why I made it again.
To see what everyone else thought, go check out the Tuesday's with Dorie Blogroll!

Up Next- Asian Chicken and Mango Salad

Monday, May 18, 2009

Buttermilk Donuts

I don't love donuts. They are one food that I can have in the house and I will never even want to take a bite. They just aren't my thing. My husband on the other hand, can and will eat a dozen Krispy Kremes without blinking an eye. In less than 24 hours. How do I know this? He has done it before. The other day, my friend called me and said that she had found a really interesting recipe for donuts that didn't use yeast, didn't have any resting time for the dough, and she wanted to give them a try. I told her to come over and we had hot donuts less than a half an hour later. Seriously.
My friend found this recipe in an old, little booklet called Famous Mormon Recipes by Winnifred Jardine. She had been given the booklet by her grandmother and I realized I had seen this recipe in the local paper a couple of months ago. I have the link to the article below. I also realized that this compilation of recipes was put together by Winnifred Jardine, who wrote a meal plan/grocery list/ cookbook, that my mother used all the time when we were growing up. That really has nothing to do with this recipe, but it was interesting to me.
We were both amazed at the simplicity of this recipe. You stir together eggs, sugar and buttermilk (we even used low-fat buttermilk), mix together a few dry ingredients, combine those together and add a little melted butter. We did this all with a spoon.
Then you roll out the sticky dough on a floured surface, cut out the donuts and fry away. We fried them in an electric skillet, in about an inch of canola oil. The dough was quite thin, but when the donuts hit the oil, they puffed up beautifully. We drained them on wire racks, with paper towels underneath, and dusted them heavily with powdered sugar.
We had happy family members who came home from school and work to warm donuts.
We were both delighted by the texture and flavor of these donuts. They were very light, not too sweet, and the hint of nutmeg was perfect. The donut holes were perfect for my younger kids. Unfortunately, the true donut lover in my family was not here to taste them, but I just might have to make them again to get his opinion.
If you have wanted to try making homemade donuts, this is a really easy recipe to start with. Let me know how it goes!

here is the article that was in the local paper a couple months ago about these donuts

here are 3 different recipes variations of this donut

Brigham Young's Buttermilk Doughnuts (Modernized by Winnifred Jardine in "Famous Mormon Recipes")
This recipe belonged to Emily Dow Partridge Young, wife of Brigham Young and my great-grandmother. Because there was not a great variety of foods, when something was made it was generally made in large quantities and Grandmother Young's recipe was double this size. You may double the recipe or cut it in half and you'll find the doughnuts are as tender and crispy and delicious as anything made out of a modern cookbook. Nutmeg, incidentally, was the chief spice in the early days and was grated tediously by hand over tiny metal nutmeg graters.
2 cups buttermilk (we used low-fat)
2 large eggs, beaten
1 cup sugar
5 cups sifted flour
2 teaspoons (baking) soda
1 teaspoon baking powder
1 teaspoon salt
1 teaspoon grated nutmeg
1/4 cup melted butter or shortening
Combine buttermilk, eggs and sugar and blend well.
Beat in sifted dry ingredients.
Then stir in melted butter.
Roll or pat dough on floured board about 1/4 inch thick and cut with 2 1/2-inch doughnut cutter. Fry in hot fat (canola oil) (375° F) till golden brown on both sides. Drain and sprinkle with sugar as desired. Makes two dozen doughnuts. (We had at least 40 donuts and lots of holes)
Coming Tomorrow- TWD- Fresh Mango Bread Muffins